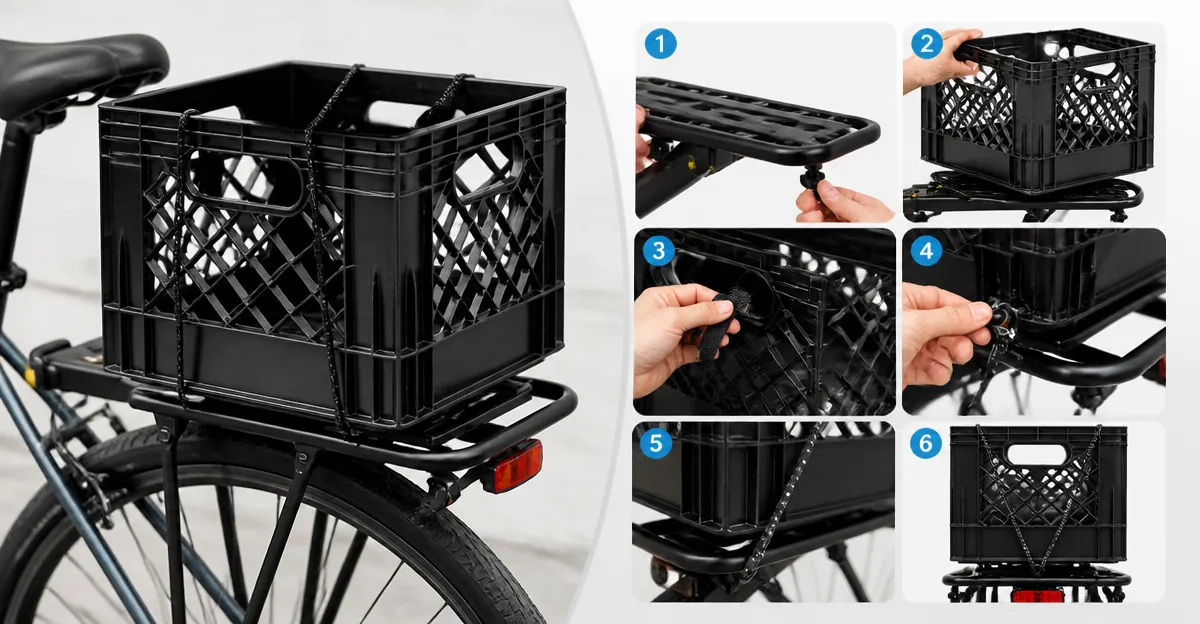
How to Mount a Milk Crate on a Topeak MTX BeamRack, Axiom Streamliner, or Basil CarryAll — Step‑by‑Step Guide to a Secure Rear‑Rack Installation
This guide explains how to transform a standard milk crate into a versatile cargo carrier for Topeak MTX BeamRack, Axiom Streamliner, or Basil CarryAll rear racks. One will learn which crates provide the best strength‑to‑weight ratio, how to attach them safely, and which accessories prevent shifting during rides. The result is a low‑cost, weather‑resistant solution that enhances the utility of any bike rack.
What You’ll Need
- Jezero Multi‑Purpose Milk Crate – 16‑qt, heavy‑duty HDPE, $25.99, 4.7★ (1,407 reviews)
- Juggernaut Storage Heavy Duty Milk Crates – 2‑pack, 16‑qt, $37.99, 4.6★ (2,291 reviews)
- U‑bolt set (M8 × 30 mm recommended) – compatible with Topeak rack holes
- Rubber washers and lock nuts – to reduce vibration
- Optional: YEEGO Foldable Rear Bike Basket – for additional rain protection, $38.99, 4.4★ (306 reviews)
- Allen key (4 mm) – for tightening bolts
Step 1: Choose the Appropriate Milk Crate
Begin by selecting a crate that matches the load you intend to carry. For light grocery runs, the Jezero Multi‑Purpose Milk Crate offers food‑grade HDPE, ergonomic handles, and a stackable design that fits most rear racks. Its 16‑qt capacity and 4.7‑star rating indicate reliable durability while remaining affordable.
If you anticipate heavier loads such as tools, water bottles, or a cooler, the Juggernaut Storage Heavy Duty Milk Crates provide 1.5 × the volume of a standard crate and a 50‑lb load rating. The reinforced handles and weather‑resistant finish make them suitable for both indoor and outdoor use.
For users who need maximum interior space, the Factory Direct Partners Milk Crates (24‑qt) double the capacity of a standard crate, allowing you to transport longer items like garden hoses or folding chairs. Their dimensions (19 × 13 × 11 in) fit within the width limits of most Topeak and Basil racks.
Step 2: Prepare the Rack Mounting Points
Inspect the Topeak MTX BeamRack, Axiom Streamliner, or Basil CarryAll for the pre‑drilled mounting holes on the rear‑rack brackets. These racks typically feature two holes spaced 6 in apart, designed for accessories such as lights or baskets.
Clean the area with a cloth to remove dust and debris. This ensures that the U‑bolts will seat firmly against the metal and that rubber washers will not slip.
Step 3: Align the Crate with the Rack
Place the chosen milk crate upside down on a flat surface. Locate the two opposite side walls that will face the rack’s mounting plates. Align the crate’s side holes (if present) with the rack’s holes. The Jezero and Juggernaut crates include pre‑drilled holes on each side for exactly this purpose.
If the crate lacks side holes, you may create them using a 1/4‑in drill, positioning them 1 in from the top edge to avoid weakening the handle. The Organize‑It Milk Crates come with side holes that line up with most rack brackets, offering a ready‑made solution.
Step 4: Install U‑Bolts and Secure the Crate
Thread a rubber washer onto each end of an M8 × 30 mm U‑bolt. Slip the bolt through the rack’s mounting hole, then through the crate’s side hole. Place a second rubber washer on the opposite side and thread a lock nut onto the bolt.
Using the 4 mm Allen key, tighten the lock nut until the crate is snug against the rack but not deforming the plastic. The rubber washers absorb vibration, preventing the crate from loosening during rough terrain.
Repeat for the second side. Verify that the crate sits level; an uneven crate can cause cargo to shift and affect bike handling.
Step 5: Add a Protective Cover (Optional)
For riders who encounter rain or dust, attach the YEEGO Foldable Rear Bike Basket over the milk crate. The basket’s 16 × 16 in net folds flat when not in use, and its waterproof cover shields contents from moisture.
Secure the basket’s hooks to the same rack brackets used for the crate, ensuring that the combined height does not exceed the bike’s rear tire clearance. This configuration creates a double‑layer barrier: the crate provides structural support, while the basket offers a flexible, weather‑proof envelope.
Step 6: Test Load Capacity and Stability
Before embarking on a ride, load the crate with a typical cargo weight—approximately 20 lb for groceries or up to 45 lb for a cooler. Close the crate’s top (if it has a lid) and gently shake it side‑to‑side. The crate should remain firmly attached with no audible clanking.
If any movement is detected, re‑tighten the U‑bolts and verify that the rubber washers are properly seated. For heavy loads, consider using the Juggernaut crates, as they are rated for 50 lb and feature reinforced handles that reduce stress on the mounting points.
Tips & Pro Tips
- Use lock‑tightening compound on the lock nuts to maintain tension over long distances.
- Periodically inspect the rubber washers for wear; replace them if they become compressed.
- When stacking multiple crates, alternate the orientation so that the handles interlock, creating a more rigid column.
- For cyclists who frequently transport pets, the YEEGO basket’s netting can hold a small carrier while the crate supports the weight.
- Apply a silicone spray to the crate’s interior grid to improve water runoff and prevent mold.
Troubleshooting
| Problem | Possible Cause | Solution |
|---|---|---|
| Crate shifts during ride | U‑bolt not fully tightened or washers missing | Re‑tighten bolts, add rubber washers, and use lock‑tightening compound. |
| Crate cracks under load | Exceeding load rating of selected crate | Switch to Juggernaut or Factory Direct Partners crate with higher capacity. |
| Rainwater enters cargo | No protective cover | Install YEEGO Foldable Rear Bike Basket with its waterproof cover. |
Conclusion
By following these steps, one can convert a simple milk crate into a secure, weather‑resistant cargo carrier for Topeak MTX BeamRack, Axiom Streamliner, or Basil CarryAll rear racks. Selecting the appropriate crate—whether the affordable Jezero, the robust Juggernaut, or the spacious Factory Direct Partners—ensures that the load capacity matches the intended use. Proper mounting with U‑bolts, rubber washers, and optional YEEGO protection yields a stable platform that enhances the bike’s functionality without compromising safety.
Implement the recommended maintenance checks after each ride, and the milk‑crate system will provide years of reliable service for groceries, tools, or even a small pet.
Products Mentioned in This Guide
Frequently Asked Questions
Which milk crate is best for mounting on a Topeak MTX BeamRack?
The Jezero Multi‑Purpose 16‑qt HDPE crate is recommended for its high strength‑to‑weight ratio and durability.
What hardware is required to secure a milk crate to a Topeak rack?
Use M8 × 30 mm U‑bolts, rubber washers, and lock nuts that fit the rack’s pre‑drilled holes.
How can I prevent the crate from shifting while riding?
Install rubber washers under the U‑bolts and tighten lock nuts; optional anti‑vibration pads add extra stability.
Is a milk crate compatible with the Axiom Streamliner and Basil CarryAll racks?
Yes, the same U‑bolt pattern works on all three Topeak rear‑rack models.
What is the maximum load I can place in a mounted milk crate?
Each 16‑qt heavy‑duty crate safely holds up to about 30 lb (13.6 kg) of gear.