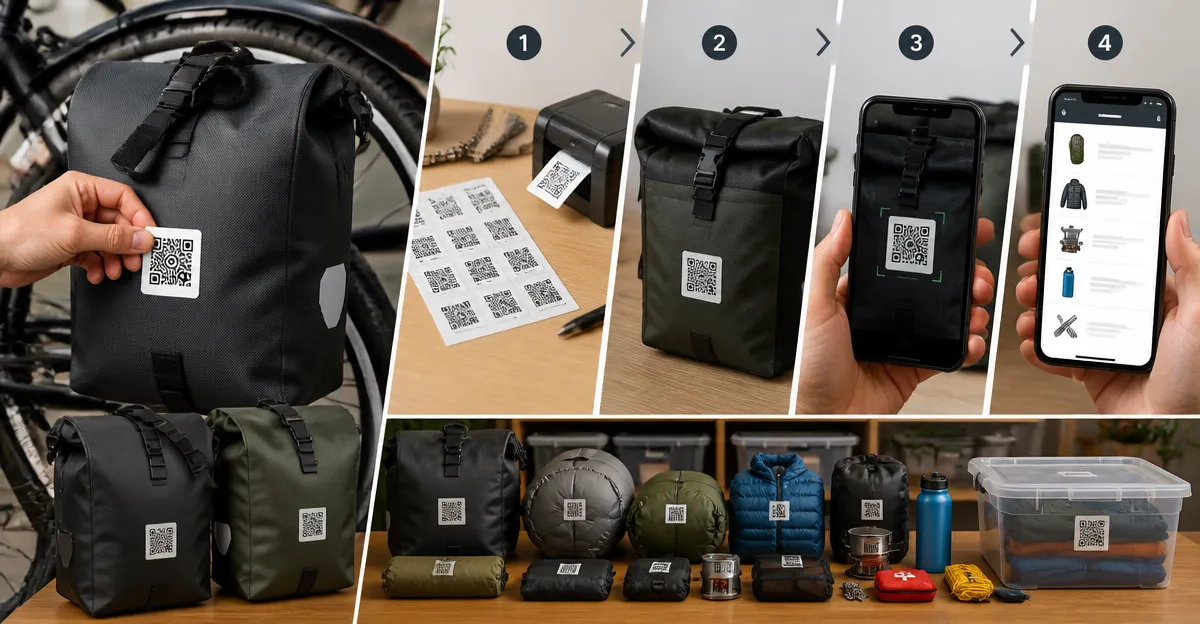
How to Implement QR Code Labels for Pannier Inventory: A Step‑by‑Step Guide to Track and Organize Your Bikepacking Gear
Introduction
Bikepackers frequently confront the challenge of locating tools, spare parts, and personal items scattered across multiple panniers. This guide explains how to use QR code labels to create a searchable, visual inventory that reduces time spent rummaging through gear. By following the steps, one will gain confidence that every item is documented, easily located, and protected against loss during long treks.
The process combines low‑cost stickers, a free mobile application, and best‑practice cataloging techniques. The result is a system that works for short weekend trips and multi‑week expeditions alike.
What You'll Need
- QR code stickers designed for storage (any of the products listed below)
- A smartphone running iOS or Android
- The corresponding free app for the chosen label brand
- A pen or marker for optional manual numbering
- Cleaning supplies such as isopropyl alcohol to prepare pannier surfaces
Step 1: Choose the Right QR Labels for Bikepacking
Several QR label systems are available, each with distinct dimensions, adhesive strength, and app features. For pannier use, durability and water resistance are paramount because gear may encounter rain, sweat, and rough handling.
ToteScan QR Storage Labels provide 45 multi‑colored, 2.5" x 3" stickers that are tear‑ and water‑resistant. The free ToteScan app allows users to assign titles, photos, and keywords, and it integrates with Alexa for hands‑free searches. At $11.95 each pack, the product holds a 4.7‑star rating from over five thousand reviewers, indicating reliable performance.
SmartPacks QR Storage Stickers are slightly smaller (2.5" x 2.5") and cost $9.99 for 48 stickers. Their app is praised for an intuitive interface and AI‑generated keywords, which can accelerate cataloging of complex gear sets. Reviewers note a 4.5‑star rating and commend the stickers’ adhesive when surfaces are cleaned before application.
If a more professional, color‑coded system is desired, SmartLabels QR Storage Labels offer 48 stickers with optional Pro upgrades for exportable reports. Priced at $15.56, they carry a 4.4‑star rating and include a photo‑extraction feature that reduces manual data entry.
For users who need custom branding or barcode formats, Bunny Badges Custom Asset Labels provide 2" x 0.7" waterproof tags with CODE‑128 barcodes. Although designed for business assets, the strong adhesive and ability to upload a logo make them suitable for high‑visibility equipment such as water‑filters or GPS units. They cost $12.95 per pack and enjoy a 4.8‑star rating.
Finally, SnapFind QR Storage Labels include AI auto‑labeling that automatically names and categorizes photographed items. At $17.95 for 48 stickers, they are the most expensive option but provide a two‑year warranty and iOS‑focused performance.
Step 2: Prepare Pannier Surfaces
Before applying any label, clean the interior surface of each pannier with isopropyl alcohol. This removes dust, grease, and moisture that could compromise adhesive bonding. Allow the surface to dry completely, typically 30 seconds, before proceeding.
For fabric‑lined panniers, a light wipe with a lint‑free cloth is sufficient. If the pannier material is textured, press the label firmly for at least five seconds to ensure full contact.
Mark a consistent location—such as the upper left corner of each compartment—so that scanning can be performed without removing gear. Consistency reduces the mental load when searching for a specific QR code during a ride.
Step 3: Apply the QR Labels
Peel each label from its backing and affix it to the prepared spot. For ToteScan QR Storage Labels, the larger size offers ample space for the multi‑colored QR pattern, making it easy to differentiate between pannier groups (e.g., food, tools, clothing). The strong adhesive is designed to withstand humidity, a common condition in bikepacking.
If using SmartPacks QR Storage Stickers, align the label with the edge of the pannier zip to keep it visible when the bag is closed. Reviewers recommend wiping the surface with alcohol beforehand, which improves stickiness and prevents premature peeling.
When applying SmartLabels QR Storage Labels, consider the color‑coding feature: assign red to emergency gear, blue to navigation tools, and green to clothing. This visual cue speeds up manual identification when the app is unavailable.
For custom asset tags from Bunny Badges, place the 2" x 0.7" stickers on high‑value items that will be removed from the pannier (e.g., a portable charger). The laminated waterproof construction protects the barcode from sweat and rain.
With SnapFind QR Storage Labels, ensure the 2.5" square label is placed on a flat area to avoid distortion of the QR code. The AI auto‑labeling works best when the label is fully visible to the camera.
Step 4: Install and Configure the Companion App
Download the app that corresponds to the chosen label brand from the Apple App Store or Google Play Store. All apps are free, and none require a subscription for basic functionality.
Open the app and create an account using an email address. This step secures personal inventory data and enables cloud backup for insurance claims—a feature highlighted by the ToteScan system.
Within the app, create a new "Pannier" or "Bag" entry for each storage compartment. Assign a clear name (e.g., "Front Left Pannier – Food") and optionally add a color tag that matches the sticker color.
Scan each QR label using the phone’s camera. The app will automatically generate a unique identifier and prompt for additional details such as item list, quantities, and photos. For SmartPacks and SmartLabels, the AI photo extraction can pre‑populate item names, reducing manual typing.
When using SnapFind, the AI auto‑labeling will suggest categories and estimated values based on the photographed contents. Review the suggestions and edit as needed for accuracy.
Step 5: Populate Inventory Data
For each pannier, list all gear items. Include the following fields: item name, quantity, condition, and optional notes (e.g., "needs cleaning before next ride"). Attach photos of the packed interior; this visual reference is especially useful for identifying small components such as spare chain links.
Leverage keyword tags to enable rapid search. For example, tag all cooking equipment with the keyword "cook" and all repair tools with "repair". The search function in each app will locate the appropriate pannier within seconds.
If using the SmartLabels Pro upgrade, export the inventory to CSV or PDF for backup or insurance documentation. The ability to generate a printable manifest is valuable when traveling across borders where customs may request itemized lists.
For custom asset tags, record the unique barcode number in a spreadsheet and cross‑reference it with the QR label in the app. This dual‑record approach provides redundancy if the smartphone battery is depleted.
Step 6: Test Scanning and Retrieval
Before embarking on a trip, perform a full scan of each pannier label while the gear is packed. Verify that the app correctly displays the associated inventory and that the QR code reads without error. If a label fails to scan, clean the sticker surface and re‑scan.
Practice locating an item by using the app’s search bar. For instance, type "spare tube" and confirm that the app directs you to the pannier containing the spare tube. This rehearsal ensures confidence during the ride when time is limited.
For voice‑activated users, the ToteScan Alexa skill allows hands‑free queries such as "Alexa, where is my water filter?" The skill will respond with the pannier location, which can be useful when the rider’s hands are occupied.
Tips & Pro Tips
- Order a few extra labels than initially estimated. Color‑coding schemes often require additional stickers for future expansions.
- Label the exterior of each pannier with a large numeric identifier that matches the app entry. This practice simplifies manual checks when the phone is unavailable.
- Use the app’s photo feature to capture a "before" and "after" view of each pannier. This visual log assists in spotting missing items after a long ride.
- When packing, place heavier items at the bottom of the pannier to maintain balance. Record the weight distribution in the app to monitor load balance across the bike.
- For extreme weather, consider applying a clear protective film over the QR label after it is affixed. This adds an extra barrier against moisture.
- If you frequently share gear with a teammate, share the app account (ToteScan supports family sharing) so both riders can view and edit the inventory in real time.
Troubleshooting
Problem: QR code does not scan.
Solution: Ensure the label surface is clean and free of fingerprints. Re‑apply the label to a flat area if the surface is curved. If the label is damaged, replace it with a spare from the same pack.
Problem: App fails to sync data.
Solution: Verify an active internet connection and that the app is logged in with the correct email. Restart the app and, if necessary, reinstall it.
Problem: Barcode on custom asset tag cannot be read by the scanner.
Solution: Adjust lighting and hold the camera directly above the label. If scanning continues to fail, ensure the barcode is not obstructed by a protective overlay.
Conclusion
Implementing QR code labels for pannier inventory transforms a chaotic collection of gear into a searchable, visual system that saves time and reduces stress. By selecting durable stickers, preparing surfaces, applying labels consistently, and populating the companion app with detailed data, any bikepacker can locate items in seconds, even under adverse conditions. The recommended products—ToteScan QR Storage Labels, SmartPacks QR Storage Stickers, SmartLabels QR Storage Labels, Bunny Badges Custom Asset Labels, and SnapFind QR Storage Labels—provide a range of sizes, adhesive strengths, and app capabilities to suit diverse preferences. One can now embark on multi‑day adventures with confidence that every tool, spare part, and personal item is accounted for and easily retrievable.
Products Mentioned in This Guide
Frequently Asked Questions
What materials should I use for QR code labels on bikepacking panniers?
Choose waterproof, UV‑resistant stickers designed for outdoor gear, such as vinyl or polyester labels.
Which smartphones are compatible with QR code inventory apps?
Any iOS or Android phone with a camera and the free app from your label brand will work.
How do I prepare a pannier surface before applying a QR label?
Clean the area with isopropyl alcohol, let it dry, then press the sticker firmly for a secure bond.
Can I edit the inventory information after scanning a QR code?
Yes—open the app, scan the label, and update the item details or add notes instantly.
Will QR code labels survive rain and rough handling on long trips?
Durable vinyl or polyester QR stickers are rated for water resistance and can endure typical bikepacking wear.