Introduction
This guide explains how to convert a standard commuter bicycle into a capable cargo bike using eight small, affordable upgrades. One will learn which components add load capacity, improve stability, and increase safety while preserving the bike's original riding characteristics. The instructions are written for an intermediate cyclist who is comfortable with basic tools and mechanical adjustments. By following the steps, one can carry groceries, work equipment, or camping gear without purchasing a dedicated cargo bicycle.
What You’ll Need
- Allen keys, screwdrivers, and a torque wrench
- Heavy‑duty zip ties or bungee cords
- Reflective tape and LED safety lights
- Optional accessories listed in the steps below
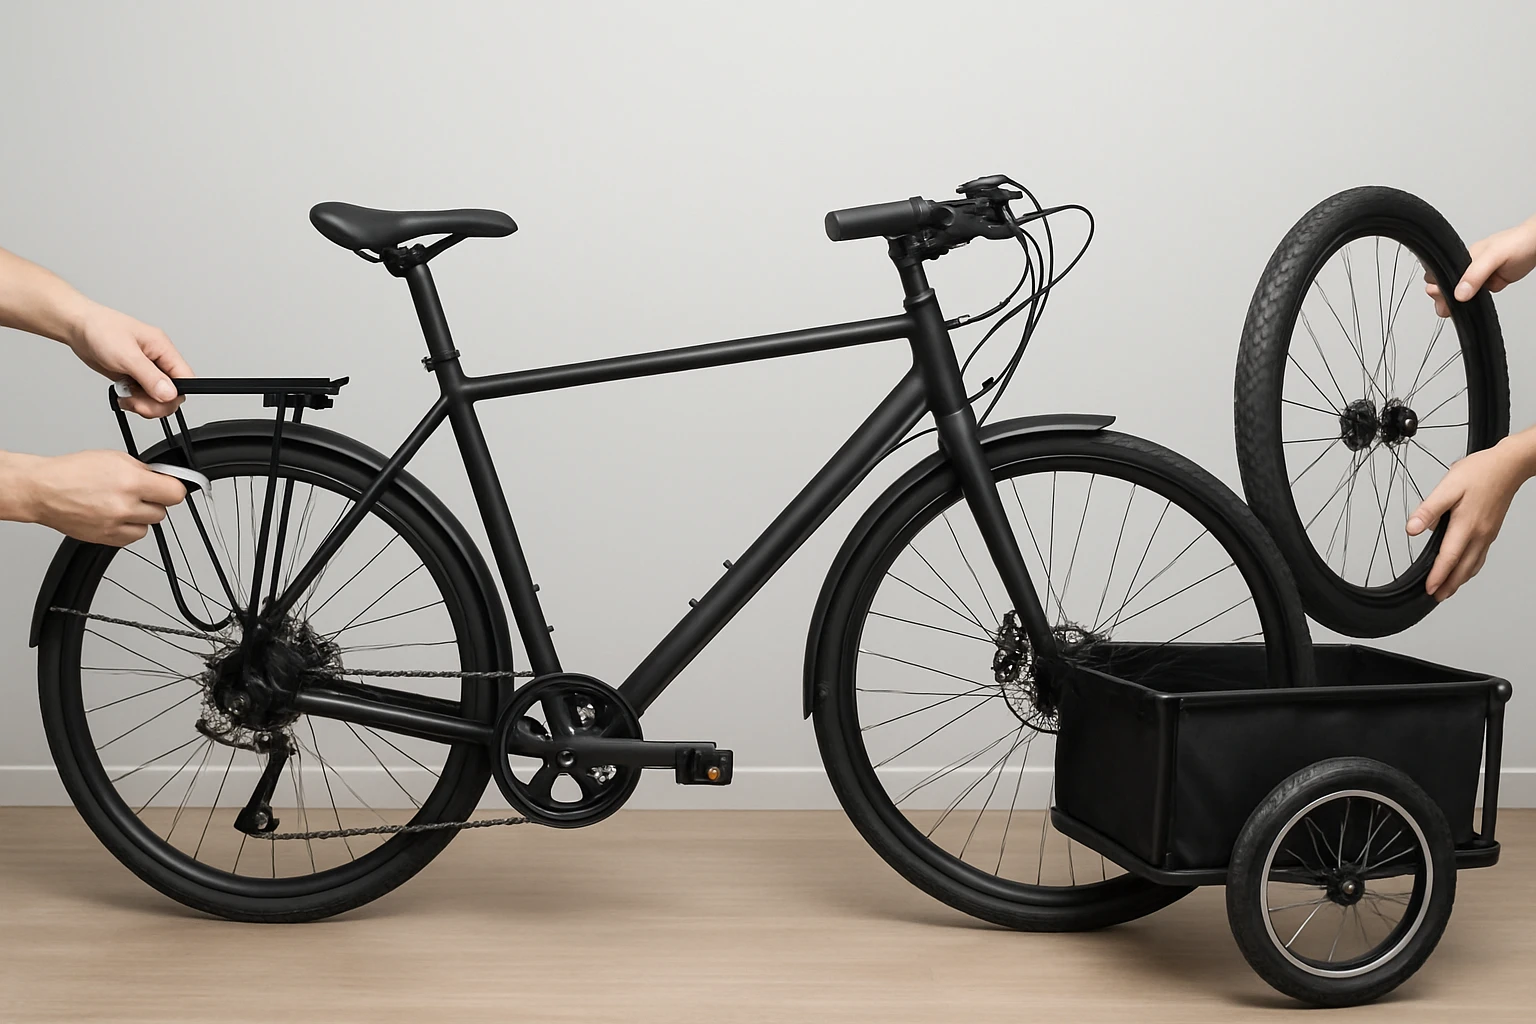
Step 1: Install a Rear Cargo Rack
Adding a rear rack creates a permanent mounting platform for pannier bags, a basket, or a small lockable box. The Schwinn Deluxe Rear Bike Rack offers a load capacity of up to 26 lb, fits most adult frames, and includes adjustable struts for centre, side, or no‑mounting‑point bikes. Its aluminum alloy construction keeps weight low while providing corrosion‑resistant durability. The rack’s rating of 4.3 stars from 3,876 reviews indicates reliable performance for daily commuting.
To install, locate the seat post and any existing braze‑ons near the rear dropout. Attach the front rails to the seat post using the quick‑release skewer, then secure the rear uprights to the dropout with the supplied bolts. Adjust the vertical struts until the rack clears the rear tire by at least 1 inch, then tighten all fasteners to the manufacturer’s torque specification. Verify that the rack sits level; an uneven platform can cause cargo to shift during turns.
The advantage of this rack over a simple strap‑on solution is its rigid frame, which distributes weight evenly across the bike’s rear triangle. This reduces stress on the rear wheel spokes and improves handling when the bike is fully loaded. For riders who prefer a minimalist approach, the rack can be removed quickly using the same quick‑release hardware.
Step 2: Add a Bike Cargo Trailer for Larger Loads
When the intended cargo exceeds the rear rack’s 26 lb limit, a trailer provides a separate, high‑capacity platform. The VEVOR Bike Cargo Trailer supports up to 71 lb, features a 27.2" × 16.9" × 11" cargo box, and folds for compact storage. Its carbon‑steel frame and powder‑coated finish ensure long‑term rust resistance, while 20‑inch dual‑layer tires and a spring suspension system maintain stability on uneven pavement or light off‑road terrain.
Begin by assembling the trailer according to the illustrated manual. Attach the universal hitch to the bike’s rear axle using the quick‑connect lever, then lock the hitch in place. Verify that the trailer’s wheels rotate freely and that the brake pads do not contact the rims when the bike is stationary. Load the cargo box evenly, placing heavier items low and centered to keep the centre of gravity close to the axle.
The VEVOR trailer excels in scenarios such as grocery runs, weekend camping trips, or transporting tools to a job site. Compared with a larger cargo bike frame, the trailer adds capacity without significantly increasing the bike’s weight, and it can be detached when not needed, preserving the bike’s maneuverability in urban traffic.
Step 3: Upgrade to Wider, Puncture‑Resistant Tires
Carrying additional weight demands greater contact patch and improved shock absorption. Replace the stock tires with 28‑mm or 32‑mm wide, puncture‑resistant models that feature a reinforced sidewall. Wider tires lower rolling resistance when loaded and provide better grip on wet or uneven surfaces. Choose a tire with a 60‑TPI (threads per inch) casing for added durability.
To install, deflate the existing tire, break the bead, and remove the rim strip. Place the new tire onto the rim, insert a compatible tube, and inflate to the recommended pressure—typically 40‑50 psi for a loaded commuter bike. Re‑check the rim alignment after a short test ride to ensure the tire does not rub the frame or brake pads.
Upgrading tires reduces the likelihood of pinch flats caused by increased load, and the larger contact area distributes weight more evenly across the ground. This simple change improves overall ride comfort and safety, especially when navigating potholes or gravel paths.
Step 4: Add Pannier Bags or a Front Basket
For items that need quick access, attach waterproof pannier bags to the rear rack or a sturdy front basket to the handlebars. Panniers keep the load low and centered, preserving balance. Look for bags with reinforced stitching, roll‑top closures, and reflective side panels.
Secure the panniers using the rack’s side rails and the included buckle straps. Adjust the straps so that the bags sit snugly against the rack without swinging. If a front basket is preferred, mount it using a universal stem clamp that fits the handlebar diameter. Ensure the basket’s weight limit is not exceeded; a typical 5‑kg basket is sufficient for a laptop, water bottle, or small tools.
The combination of rear rack and pannier bags creates a modular cargo system that can be reconfigured based on daily needs. This flexibility is essential for commuters who may alternate between a light work bag and a larger grocery load.
Step 5: Install Reflective Tape and LED Lights
Increased cargo can reduce visibility, especially at dusk or during inclement weather. Apply high‑visibility reflective tape to the edges of the cargo box, the rear rack’s frame, and the trailer’s folding brackets. The VEVOR trailer already includes reflective stickers, but additional tape enhances the warning zone.
Mount a set of front and rear LED lights on the handlebars and rear rack. Choose lights with a minimum output of 800 lumens and a battery life of at least 10 hours on high mode. Secure the lights with zip ties or the supplied mounting brackets, ensuring that the light beams are not obstructed by cargo.
These safety upgrades significantly lower the risk of accidents caused by reduced visibility. Reflective tape works passively, while LED lights provide active illumination, making the bike and its load conspicuous to motorists.
Step 6: Fit a Sturdy Loading Handle
Loading heavy items onto a low cargo box can be awkward. Attach a short, reinforced handle to the trailer’s cargo deck or the rear rack’s top rail. A 6‑inch steel pipe with a rubber grip offers a convenient lever for lifting and positioning bags.
Drill two ¼‑inch holes into the cargo deck, insert the pipe ends, and secure them with stainless‑steel bolts and lock washers. Apply a thin layer of silicone sealant to prevent moisture ingress. Test the handle by lifting a fully loaded bag; the handle should feel solid and not flex under load.
This simple addition reduces strain on the rider’s back and speeds up the loading and unloading process, especially when frequent stops are required during errands.
Step 7: Add a Lockable Cargo Box
When transporting valuable items, a lockable cargo box provides theft deterrence. Choose a hard‑shell box with a built-in latch and a key lock. The box should fit within the dimensions of the VEVOR trailer’s cargo area or the rear rack’s platform.
Secure the box using the rack’s side rails and the trailer’s tie‑down points. Use heavy‑duty steel cables to loop through the box’s built‑in eyelets and around the bike frame, then tighten with a cable lock. Ensure the cable does not interfere with wheel rotation or brake operation.
By integrating a lockable box, one can safely transport electronics, tools, or personal belongings without fear of opportunistic theft, a common concern in urban environments.
Step 8: Implement Quick‑Release Wheel Axles for Easy Folding
Carrying a loaded bike on public transport or storing it in a small apartment benefits from a quick‑release axle system. Replace the rear wheel’s standard axle with a quick‑release skewer that can be removed without tools.
Remove the rear wheel, slide the quick‑release skewer through the hub, and secure the nut on the opposite side. Adjust the lever tension so that the wheel stays firmly in place during rides but releases with a single pull when needed. Re‑install the wheel, ensuring the brake pads align correctly.
This upgrade enables rapid conversion between a fully loaded cargo configuration and a compact folded state, enhancing the bike’s versatility for multi‑modal commuters.
Tips & Pro Tips
- Distribute weight evenly between the front and rear of the bike to maintain steering responsiveness.
- Periodically check all bolts, especially on the rear rack and trailer hitch, to prevent loosening under load.
- Use zip ties made of UV‑resistant material to avoid degradation from sun exposure.
- When riding with a trailer, practice braking in a safe area to gauge the increased stopping distance.
- Consider adding a small rearview mirror to maintain situational awareness while the cargo blocks the view of the rear wheel.
Troubleshooting
Problem: Trailer hitch wobbles during rides.
Solution: Tighten the quick‑connect lever and ensure the hitch pin is fully inserted. If wobble persists, apply a thin layer of thread‑locker to the hitch bolt.
Problem: Rear rack interferes with brake pads.
Solution: Adjust the rack’s vertical struts upward until a clearance of at least 5 mm is achieved. Re‑align the brake caliper if necessary.
Problem: Cargo shifts and causes instability.
Solution: Use bungee cords to secure items to the rack’s side rails or trailer’s tie‑down points. Place heavier items low and centered.
Conclusion
By applying these eight DIY upgrades, one can transform a modest commuter bicycle into a flexible cargo platform capable of handling groceries, work tools, and weekend gear. The guide emphasizes practical solutions, such as the Schwinn Deluxe Rear Bike Rack for everyday loads and the VEVOR Bike Cargo Trailer for larger hauls. With proper installation, regular maintenance, and thoughtful loading practices, the commuter bike becomes a reliable cargo companion, reducing reliance on cars and contributing to a more sustainable lifestyle.
Products Mentioned in This Guide
Frequently Asked Questions
What are the essential tools needed to convert a commuter bike into a cargo bike?
You’ll need basic Allen keys, screwdrivers, a torque wrench, heavy‑duty zip ties or bungee cords, and optional reflective tape and LED lights.
Can any commuter bike frame accommodate a rear cargo rack?
Most adult‑size commuter frames with eyelets or a sturdy rear triangle can fit a standard rear rack, but double‑check the rack’s mounting specifications.
How much weight can a typical DIY cargo bike upgrade support?
A quality rear rack like the Schwinn Deluxe can carry up to 26 lb, and additional accessories such as pannier bags can increase total load to around 40‑50 lb when distributed evenly.
What safety upgrades are recommended after converting to a cargo bike?
Add reflective tape, LED lights, and secure cargo with zip ties or bungee cords to maintain visibility and prevent shifting while riding.
Is converting a commuter bike to a cargo bike cost‑effective compared to buying a dedicated cargo bike?
Yes; the eight small upgrades usually cost a fraction of a purpose‑built cargo bike while still providing comparable load capacity for everyday hauling.