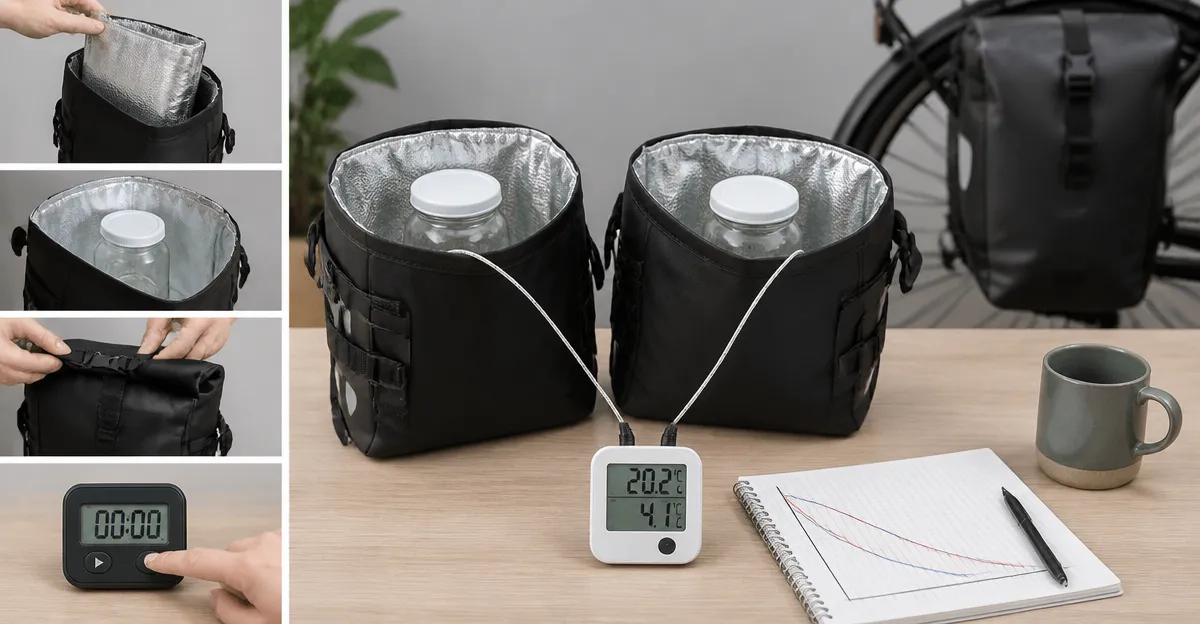
How to Test Thermal Insulation of Pannier Liners: DIY At-Home Step-by-Step Guide
In this guide the reader will learn how to evaluate the thermal performance of motorcycle or bicycle pannier liners using simple household tools. Understanding insulation values helps riders choose liners that keep gear warm in winter and cool in summer, thereby protecting sensitive equipment. The method described requires no specialized laboratory equipment, only common items and optional products that improve accuracy. By following each step one can obtain reliable temperature differentials and make informed purchasing decisions.
What You'll Need
- Digital thermometer with a probe (minimum -20°C to 120°C range)
- Two identical insulated containers (e.g., hard‑case panniers or sturdy plastic boxes)
- Hot water source (kettle or pot)
- Cold water source (ice bath)
- Stopwatch or timer
- Pen and data‑logging sheet
- Optional: Tusk Pannier Box Liners for baseline comparison
- Optional: Great Bikers Gear Pannier Liners for waterproof testing
Step 1: Prepare the Test Environment
The first major step is to create a controlled environment where external temperature fluctuations are minimized. Choose a room with stable ambient temperature, ideally between 20°C and 22°C, and close windows and doors to prevent drafts. Place the two insulated containers on a flat surface, and if you own Tusk Pannier Box Liners, line one container with them to serve as the test subject while the other remains empty as a control.
The Tusk liners are constructed from 420D nylon with heavy‑duty zippers and sturdy handles, costing $31.57 and earning a 4.4‑star rating from 13 reviewers. Their durable construction ensures the liner does not deform during the heat exposure, providing consistent results. By using a liner that is designed specifically for adventure motorcycles, the test mimics real‑world conditions. The control container allows you to isolate the effect of the liner material from the container’s own insulation.
Step 2: Install Temperature Sensors
Insert the thermometer probe into the center of each container, ensuring the tip does not touch the walls. Secure the probe with a small piece of tape so it remains stationary throughout the test. Record the initial temperature of each container; this baseline will be subtracted from later readings to calculate the net insulation gain.
Accurate placement of the probe is critical because heat transfer occurs primarily through conduction and convection. A probe positioned too close to the wall will record higher temperatures, artificially inflating the liner’s performance. Use a digital thermometer that logs data at one‑minute intervals for the most precise analysis. If you lack a data‑logging thermometer, manual readings taken every five minutes are acceptable, though less accurate.
Step 3: Introduce a Heat Source
Heat the water in a kettle to approximately 80°C, then carefully pour 500 ml into each container, filling them to the same level. Immediately seal the containers, ensuring the lids are tightly fastened; the Tusk liner’s heavy‑duty zippers prevent accidental opening. Start the timer as soon as the water is added and note the temperature at 0, 5, 10, 15, and 20 minutes.
The purpose of the hot water is to simulate a warm load such as heated clothing or electronic devices. By comparing the temperature decay curves of the liner‑filled container versus the empty control, you can quantify the thermal resistance of the liner. The heavy‑duty zippers on the Tusk liners are rated for repeated use, which reduces the risk of heat loss through gaps. Record all observations in a table for later analysis.
Step 4: Conduct a Cold‑Water Test (Optional)
If you own Great Bikers Gear Pannier Liners, repeat the procedure using ice water at 0°C to assess performance in cold conditions. The Great Bikers Gear liners are made from 600D cordura with a PVC coating, providing a water‑resistant barrier that is useful when testing against moisture ingress. They are priced at $84.99 and have a 4.3‑star rating from 56 reviewers, indicating strong overall satisfaction.
During the cold test, the reflective piping on the Great Bikers Gear liners helps retain heat by reflecting infrared radiation back toward the interior. This feature is particularly valuable for riders who travel in low‑temperature environments. Follow the same timing protocol as the hot‑water test, recording temperatures at identical intervals. Comparing hot and cold results gives a comprehensive view of the liner’s thermal envelope.
Step 5: Analyze the Data
Plot the temperature readings on a graph with time on the horizontal axis and temperature on the vertical axis. The slope of each line indicates the rate of heat loss; a flatter slope corresponds to better insulation. Subtract the control line from the liner‑filled line to isolate the liner’s contribution. Calculate the thermal resistance (R‑value) using the formula R = ΔT / (Q·A), where ΔT is the temperature difference, Q is the heat flow, and A is the surface area of the container.
While the exact R‑value calculation may require additional data such as heat capacity, the relative comparison between different liners is sufficient for most riders. If the Tusk liner shows a 30 % slower temperature decline than the control, it demonstrates effective insulation for typical adventure riding scenarios. Document the findings in a concise report that includes the graph, calculated R‑values, and any observations regarding ease of handling.
Step 6: Clean Up and Store Your Equipment
After the final readings, dispose of the water responsibly and allow the containers to cool before handling. Remove the thermometer probes, wipe any condensation from the interior, and dry the liners thoroughly. Store the liners in a cool, dry place to prevent mold growth, especially if you performed the cold‑water test.
Proper maintenance prolongs the lifespan of the liners and ensures consistent performance in future tests. If you used the Great Bikers Gear or Tusk liners, inspect the zippers and handles for any signs of wear; both products feature reinforced stitching that should withstand repeated use. Finally, archive your data for future reference when evaluating new products or replacement liners.
Tips & Pro Tips
- Use identical containers for both test and control to eliminate variables caused by differing wall thickness.
- Perform the test at the same time of day to avoid ambient temperature swings.
- For more precise results, consider adding a second thermometer probe to each container to average readings.
- When testing waterproof liners, ensure the seal is fully engaged to prevent water leakage, which can skew temperature data.
Troubleshooting
- Temperature spikes after sealing: Check that the lid is fully closed and that the zipper on the liner is not partially open.
- Inconsistent readings between probes: Verify that both probes are calibrated; many digital thermometers have a calibration mode.
- Condensation causing water on the exterior: Increase ventilation around the test area or use a dehumidifier to keep ambient humidity low.
Conclusion
This guide has demonstrated a straightforward, repeatable method for testing the thermal insulation of pannier liners at home. By following the six steps, riders can quantify how well a liner retains heat or cold, compare different products, and make data‑driven purchasing decisions. The optional use of Tusk Pannier Box Liners and Great Bikers Gear Pannier Liners illustrates how specific features such as heavy‑duty zippers and reflective piping enhance performance. Whether you are a seasoned adventure rider or a commuter cyclist, applying this test will help ensure your gear remains protected in any climate.
Products Mentioned in This Guide
Frequently Asked Questions
What tools are needed to test pannier liner thermal insulation at home?
You need a digital thermometer with probe, two identical insulated containers, hot water, an ice bath, a timer, and a data‑logging sheet; optional liners can serve as baselines.
How do I set up the temperature test using hot and cold water?
Fill one container with hot water, the other with an ice‑water bath, place the thermometer probe inside each liner, then record the initial temperatures.
How long should I record the temperature difference for accurate results?
Monitor the temperatures for at least 10–15 minutes, noting readings every minute until they stabilize.
Can I compare different pannier liners using the same test method?
Yes, run the same procedure on each liner under identical conditions and compare the temperature differentials to assess insulation performance.
Why is testing thermal insulation important for motorcycle or bicycle pannier liners?
It helps riders choose liners that keep gear warm in cold weather and cool in heat, protecting sensitive equipment and improving ride comfort.