How to Stop Pannier Rattling: Quick, Proven Fixes to Silence Your Bike Bags
Introduction
Rattling panniers can distract a rider, reduce efficiency, and even cause premature wear on bag components. This guide explains how to diagnose the source of noise and apply practical solutions that restore quiet performance. Readers will learn a systematic approach that combines proper mounting, vibration damping, and strategic product use. By following the steps, cyclists of all skill levels will experience a smoother, more enjoyable ride.
The techniques described are grounded in real‑world feedback from cyclists who have tested the recommended products. While the guide can be applied with basic tools, certain accessories streamline the process and provide long‑term stability. The following sections present each action in detail, ensuring that the reader can implement the fixes confidently.
What You'll Need
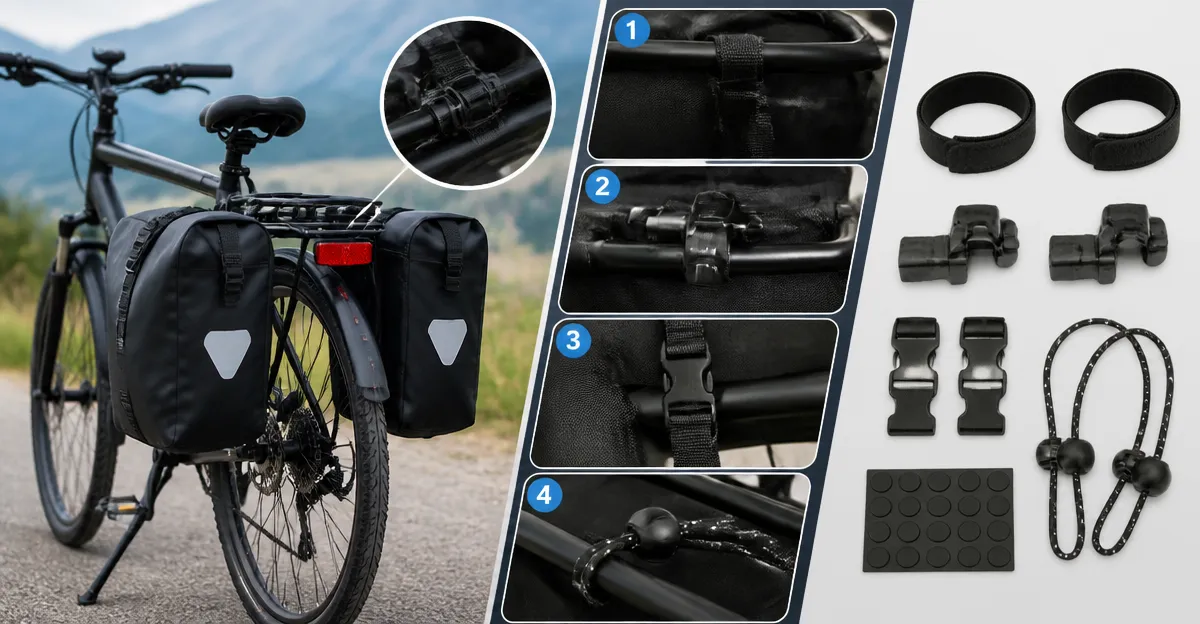
- Adjustable Velcro straps or buckle straps (often included with panniers)
- Foam or rubber padding strips for vibration damping
- Thread‑locking compound (optional for metal hardware)
- Zip ties or cable ties for securing loose components
- One of the recommended pannier models for optimal fit and design
1. Inspect the Mounting System
The first step is to examine how the pannier attaches to the rear rack. Loose buckles, misaligned hooks, or worn straps are common sources of rattling. Remove the bag and verify that the rack’s width is compatible with the bag's mounting points. For most city, hybrid, and e‑bike racks, the KEMIMOTO 34L Waterproof Bike Pannier Bag offers a double‑system fastener that includes six heavy‑duty straps and two side hooks, providing a secure connection that minimizes movement.
When inspecting, look for any frayed edges on the straps and ensure that the metal hooks are not bent. The KEMIMOTO bag’s 600D PVC fabric and reinforced backing help distribute load evenly, reducing stress on the rack. If the rack itself is flexible, consider adding a protective sleeve or rubber strip to increase rigidity.
2. Tighten Straps and Velcro Securely
After confirming compatibility, re‑attach the pannier and tighten every strap uniformly. Uneven tension creates gaps that allow the bag to bounce during pedaling. The ROCKBROS Waterproof Bike Pannier features a quick‑release mounting system with three‑point attachment and rotatable brackets, allowing precise adjustment of strap tension.
Pull each strap until the bag sits flush against the rack, then secure the Velcro with a firm press. The ROCKBROS design includes two movable buckles that lock in place, preventing accidental loosening on rough terrain. Verify that the bag does not shift when the bike is rocked side to side.
3. Add Anti‑Rattle Inserts
Even with tight straps, minor vibrations can travel through the bag material. Inserting thin foam strips or rubber padding between the bag and rack absorbs these vibrations. Cut a piece of closed‑cell foam to match the width of the rack and slide it behind the pannier before re‑mounting.
The Bushwhacker Omaha Grocery Bike Panniers are designed with an open‑top mesh that accommodates such inserts without compromising capacity. Their metal hooks and bungee‑S‑hook system provide a stable platform for the foam, ensuring that the padding remains in place during long rides.
4. Use a Rain Cover to Reduce Flapping
Many panniers include a rain cover that doubles as a wind‑breaker. When the cover is loosely folded, it can flap against the bag, creating a rattling sound. Deploy the rain cover fully and secure it with the built‑in Velcro straps.
The JXFUKAL Hard Shell Rear Bike Rack Bag includes a dedicated rain cover that snaps onto the bag’s exterior, adding a waterproof barrier while also stabilizing the bag’s shape. The hard shell prevents the cover from billowing, thereby eliminating an additional source of noise.
5. Adjust the Obtuse‑Angle Design
Some panniers are shaped to sit at an obtuse angle, keeping the rider's legs clear of the bag. If the angle is too shallow, the bag may contact the pedal or crank, generating a clacking noise. Adjust the mounting position forward or backward until the bag rests at a comfortable angle.
The KEMIMOTO bag is engineered with an optimized obtuse‑angle shape that naturally avoids heel strikes. By sliding the bag slightly forward on the rack, the rider can achieve a balance between clearance and stability, eliminating contact‑induced rattles.
6. Secure Loose Hardware with Thread‑Lock
Metal buckles and hooks can loosen over time, especially on rough trails. Applying a small amount of thread‑locking compound to the screw threads of the buckles prevents gradual loosening. This step is optional but highly effective for riders who demand maximum reliability.
For the Vuudh model, the four metal buckles are robust but benefit from occasional tightening. The Vuudh 36L Waterproof Double Bike Panniers feature sturdy metal buckles and a Velcro bottom strap; securing these with thread‑lock ensures they remain tight during extended tours.
7. Test Ride and Fine‑Tune
After completing the adjustments, perform a short test ride on varied terrain. Listen for any residual noise and observe the bag's movement. If rattling persists, repeat steps 2 through 5, focusing on any strap that appears to slip.
During the test, pay attention to how the bag behaves when braking sharply or navigating potholes. A properly silenced pannier will remain stationary, and the rider will notice a noticeable reduction in vibration transmitted to the handlebars.
Tips & Pro Tips
- Use zip ties to bundle excess strap length; this prevents them from flapping against the frame.
- Apply reflective tape to the bag's exterior for added safety without affecting noise levels.
- Periodically check the condition of Velcro; replace worn pieces to maintain a secure grip.
- For e‑bikes with battery packs under the rack, select a pannier with a low‑profile design such as the JXFUKAL Hard Shell Bag to avoid interference.
Troubleshooting
Problem: Persistent clicking when pedaling.
Solution: Verify that the bag does not contact the crank arms. Adjust the mounting position forward and add foam padding as described in Step 3.
Problem: Bag shifts during sudden stops.
Solution: Tighten all straps again and consider using a second set of Velcro straps for redundancy.
Conclusion
Eliminating pannier rattling requires a methodical approach that addresses mounting security, vibration damping, and proper positioning. By following the seven steps outlined above, cyclists can achieve a quiet, stable ride without sacrificing cargo capacity. The recommended products—KEMIMOTO, ROCKBROS, Bushwhacker, JXFUKAL, and Vuudh—provide reliable tools that simplify each step while delivering durability and weather protection.
Implement the fixes, test the results, and enjoy the newfound peace of a silent ride. Continued maintenance of straps and hardware will preserve the quiet performance for many miles to come.
Products Mentioned in This Guide
Frequently Asked Questions
Why do pannier bags start rattling while riding?
Loose straps, insufficient padding, and metal hardware that vibrates against the frame are the most common causes of pannier noise.
How can I secure my pannier straps to prevent rattling?
Tighten all Velcro or buckle straps and use zip ties on any excess strap length to eliminate movement.
What type of padding works best for damping pannier vibrations?
Thin foam or rubber strips placed between the bag and the rack absorb vibrations and quiet the bag.
Should I use thread‑locking compound on pannier hardware?
Applying thread‑locking compound to metal bolts and screws can stop them from loosening and creating noise over time.
Are there specific accessories that make a long‑term fix for rattling panniers?
Dedicated anti‑vibration pads, rack clamps, and reusable zip ties provide a durable solution that keeps panniers silent on every ride.