Introduction
Riders who rely on integrated rear lights understand that visibility is a non‑negotiable safety factor. When panniers are added to a rear rack, they can inadvertently shade or block those lights, reducing the rider’s presence to motorists and pedestrians. This guide explains how to mount panniers correctly so that the lights remain unobstructed, while also providing practical product recommendations that simplify the process. By following the steps, one will achieve a balanced load, maintain optimal light output, and enjoy a more confident ride during dusk or night hours.
What You’ll Need
- Bike rear rack compatible with pannier mounting (standard width less than 6 inches).
- Adjustable straps or buckles (included with most panniers).
- Tools for minor adjustments – typically a hex key or screwdriver.
- One of the recommended pannier solutions for reliable waterproofing and secure attachment.
- Reflective tape or additional mounting brackets for fine‑tuning clearance.
Step 1: Inspect the Integrated Rear Light and Rack Geometry
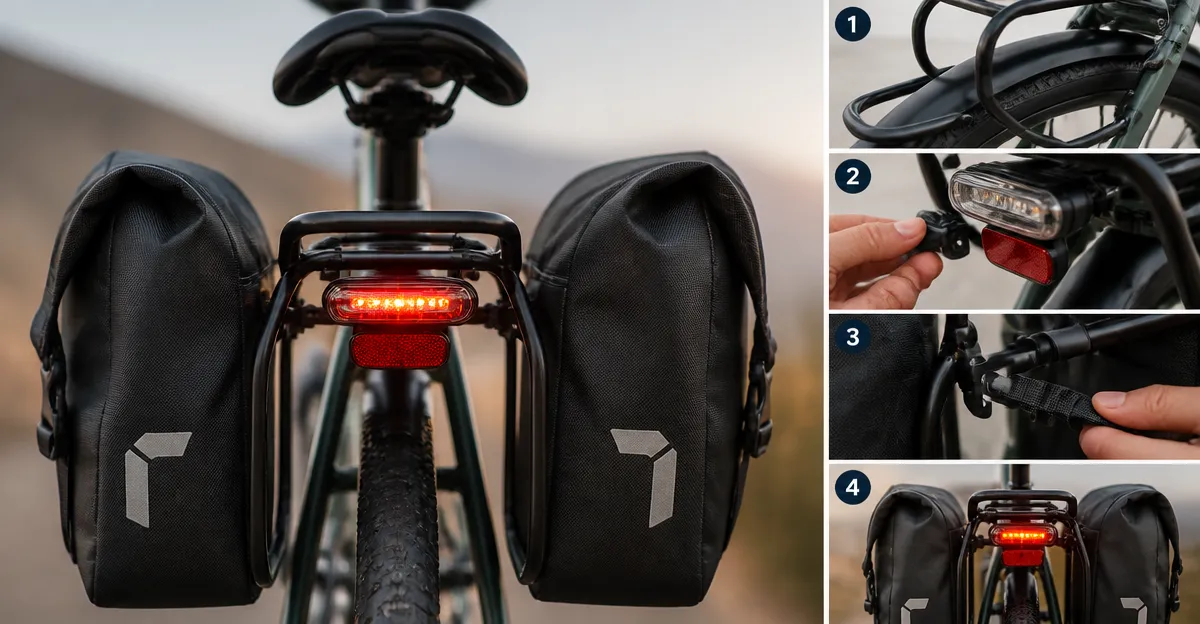
The first task is to locate the rear light housing on the bike frame or rack. Measure the vertical distance from the rack surface to the top of the light and note any protruding lenses. Understanding this geometry helps you select a pannier that will sit either above or beside the light without covering it. If the light is mounted on the rack itself, you may need a pannier with a low‑profile side wall or an obtuse angle design that creates a natural gap.
Step 2: Choose a Pannier That Provides Sufficient Clearance
Among the options, the KEMIMOTO 34L Waterproof Bike Pannier offers an obtuse‑angle shape that deliberately leaves space for the rider’s feet and rear lights. Its 34 L total capacity (17 L per side) is ideal for commuters who need to carry a laptop, clothing, and groceries without overloading the rack. The rain cover and 600D Oxford fabric protect contents from sudden downpours, while the double‑system fasteners keep the bag firmly in place.
For riders who prefer a rigid exterior, the JXFUKAL Hard Shell Bike Rack Bag features a hard EVA shell with a built‑in rain cover. Its 9.5 L capacity is smaller, but the hard sidewalls maintain a consistent profile that rarely encroaches on rear lights. The reflective accents on four sides also enhance night‑time visibility, complementing the bike’s own lighting system.
If maximum waterproofing is required, the ROCKBROS Waterproof Bike Pannier utilizes a roll‑top closure and PVC‑coated fabric. The design includes a low‑profile front edge that can be positioned just behind the light, ensuring the lens remains exposed. Its 30 L capacity strikes a balance between volume and clearance.
For riders who need extra cargo space, the Marscamd 50L Bike Pannier Bag expands to 50 L when unzipped. The bag incorporates side pockets and an adjustable drawstring that can be tightened to sit higher on the rack, preserving a clear line of sight for the rear light.
Step 3: Prepare the Rack and Install Mounting Hardware
Most panniers attach with a combination of heavy‑duty straps, Velcro loops, and buckles. Begin by loosening any existing straps on the rack to create a clean workspace. If the rack includes a built‑in light mount, verify that the mounting points are not obstructed by the rack’s own hardware. Use a hex key to tighten the rack bolts after the pannier is positioned, ensuring the rack remains stable under load.
For the KEMIMOTO model, six heavy‑duty straps and two side hooks provide a secure fit. Align the bag so that the front lip sits just above the light housing, then fasten each strap in sequence, checking that the rain cover does not drape over the light. The JXFUKAL bag uses two buckle straps and a Velcro strap; its hard shell allows you to slide the bag into place and then tighten the buckles, creating a rigid barrier that naturally leaves a gap for the light.
Step 4: Attach the Pannier While Maintaining Light Visibility
With the rack prepared, lift the pannier onto the rear rack. Position the bag so that any built‑in reflective strips are visible from the rear and sides. For the ROCKBROS pannier, engage the three‑point attachment system: insert the two movable buckles into the rack slots, then rotate the bracket 360 degrees to lock it securely. Ensure the roll‑top closure is closed but not so tight that it presses against the light housing.
If you are using the Marscamd bag, take advantage of its internal stiff plates. These plates keep the bag from sagging into the light area. Adjust the side drawstrings to raise the bag slightly, creating a clear corridor for the light lens. Double‑check that all buckles are fully engaged and that the reflective strips are not covered by any strap.
Step 5: Fine‑Tune Positioning and Test Light Output
After the pannier is mounted, turn on the rear light and observe its illumination from a distance of three meters. If the light appears dimmed, gently raise the bag by loosening the lower straps and re‑tightening them higher on the rack. Adding a short piece of reflective tape to the bag’s upper edge can also help signal the light’s presence to drivers.
Run a short test ride in low‑light conditions. Pay attention to any wobble that may cause the bag to shift during braking or cornering. If movement is detected, tighten the side hooks (KEMIMOTO) or the extra buckles (Marscamd) to prevent the bag from sliding into the light path.
Tips & Pro Tips
- Prefer panniers with an obtuse‑angle or low‑profile front edge to naturally preserve light clearance.
- Use reflective tape on the bag’s upper edge if the light is positioned very low on the rack.
- When carrying heavy loads, distribute weight evenly between left and right panniers to maintain bike balance.
- Check the tightness of all straps after the first 10‑15 kilometres; vibrations can loosen connections.
- Consider adding a secondary clip or D‑ring (available on the Marscamd bag) to secure the bag to the frame for extra stability.
Troubleshooting
| Problem | Possible Cause | Solution |
|---|---|---|
| Rear light dim after mounting | Bag covering the light lens | Raise the bag using adjustable straps; add a spacer if needed. |
| Pannier shifts during rides | Insufficient strap tension | Tighten all buckles and use side hooks for additional security. |
| Water ingress during rain | Improperly sealed roll‑top or rain cover | Ensure the rain cover is fully deployed (KEMIMOTO) or the roll‑top is zipped tightly (ROCKBROS). |
Conclusion
Mounting panniers without blocking integrated rear lights is achievable by selecting the right bag, positioning it carefully, and using the appropriate fastening system. The recommended products—KEMIMOTO 34L Waterproof Bike Pannier, JXFUKAL Hard Shell Bike Rack Bag, ROCKBROS Waterproof Bike Pannier, and Marscamd 50L Bike Pannier Bag—each provide features that aid in maintaining light visibility while delivering reliable cargo capacity. By following the step‑by‑step instructions, riders can enjoy organized storage, weather protection, and uncompromised safety on every night ride.
Products Mentioned in This Guide
Frequently Asked Questions
How can I mount panniers without blocking the bike’s integrated rear light?
Position the pannier straps so the bag sits just above or beside the light housing, leaving a clear line of sight for the lens.
What rear rack dimensions are suitable for mounting panniers with rear lights?
Use a rack less than 6 inches wide, which provides enough clearance for most integrated light units.
What basic tools are needed to install panniers on a rear rack?
A hex key or screwdriver and the adjustable straps or buckles that come with the panniers are sufficient.
How do I ensure proper clearance between the pannier and the rear light?
Inspect the light housing and rack geometry, then add reflective tape or a small mounting bracket to fine‑tune the gap if needed.
Are there specific pannier models recommended for keeping rear lights unobstructed?
Look for waterproof panniers with low‑profile designs and built‑in strap adjusters that allow you to position the bag away from the light.