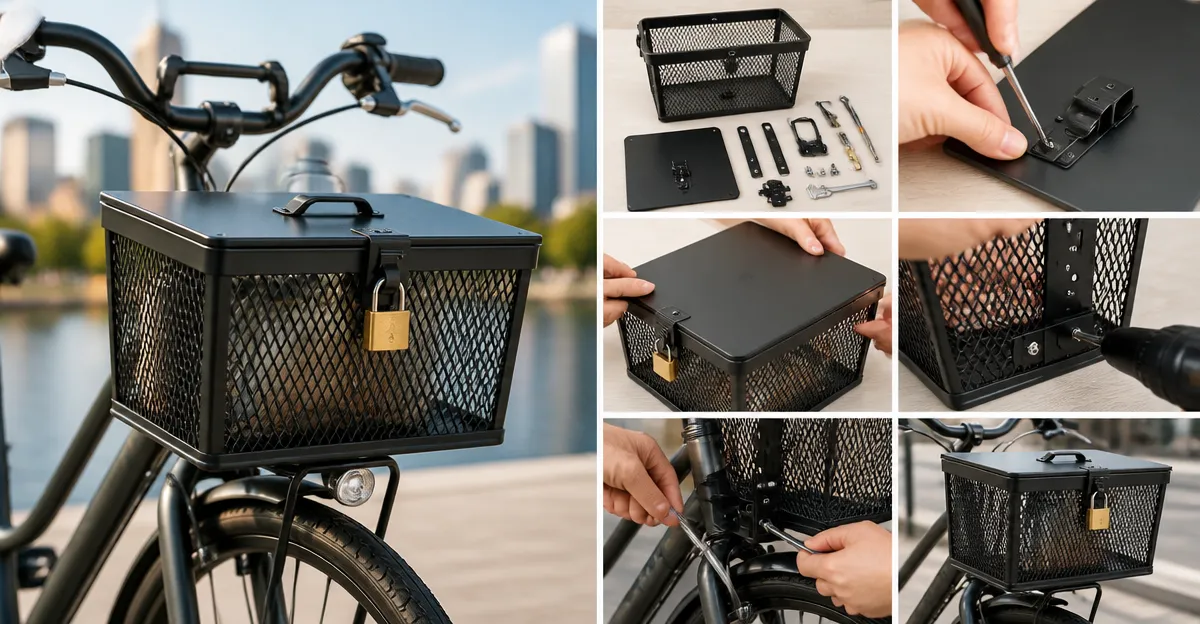
Introduction
In this guide the reader will learn how to construct a lockable front bike basket that provides secure storage for daily commuting. The process combines basic metalworking, simple fastening techniques, and the strategic use of ready‑made basket components. By following the step‑by‑step instructions one can achieve a functional accessory without extensive workshop equipment. The result is a durable, weather‑resistant basket that detaches easily yet remains protected from theft.
What You'll Need
The following materials and tools are required to complete the project. All recommended products are available on Amazon and include direct links for convenient purchase.
- Front bike basket – a sturdy steel basket such as Retrospec Apollo Bike Basket (price $26.99, rating 4.3/5 from 14,971 reviews).
- Locking mechanism – a bike‑compatible hasp and padlock set (available separately).
- Mounting brackets – stainless‑steel brackets that fit the basket’s integrated hooks.
- Adjustable straps – leather or nylon straps for added stability.
- Basic hand tools – screwdriver, wrench, and a drill with metal bits.
- Protective gloves and safety glasses.
Step 1: Gather Materials and Prepare Your Workspace
Begin by clearing a well‑ventilated work area where the basket can be placed on a sturdy table. Lay out all components, checking that the basket dimensions match the intended bike frame; the Retrospec Apollo measures 9.5" x 10.5" x 14" and fits most bicycles. Verify that the lock hasp aligns with the basket’s side rails, ensuring that the padlock will sit flush when engaged. Assemble the mounting brackets and verify that the integrated hooks on the basket snap on without the need for additional tools.
Having the correct tools at hand prevents interruptions during assembly. The screwdriver will be used to tighten the bracket screws, while the drill will create pilot holes for the lock hasp. Safety glasses protect the eyes from metal shavings, and gloves prevent hand injuries while handling the steel frame. At this stage the builder should also read the basket’s instruction sheet to become familiar with the snap‑on hook mechanism.
Step 2: Modify the Basket Frame for a Lockable Feature
To add a lockable feature, a small metal plate must be welded or bolted onto one side of the basket. If welding equipment is unavailable, the builder can use a pre‑drilled steel plate and secure it with self‑tapping screws. Position the plate near the top edge where the hasp will attach, ensuring that the lock will not interfere with the detachable handles.
The Retrospec Apollo Bike Basket already includes ergonomic handles that can be removed when the basket is locked, reducing the risk of tampering. The half‑mesh design prevents small items from slipping out, which is essential when the basket is sealed with a padlock. Use a drill to create two ¼" holes in the plate, then align them with the basket’s side rail and insert the screws. Tighten until the plate is flush and does not wobble.
Step 3: Install the Locking Hasp and Padlock
Attach the lock hasp to the metal plate using the supplied bolts. The hasp should open outward, allowing the padlock to slide through the basket's side opening. Secure the bolts with a wrench, making sure they are tightened to the manufacturer's torque specifications. Test the hasp by opening and closing it several times to confirm smooth operation.
When the hasp is in the closed position, the padlock will prevent the basket from being removed from the bike. A standard 7 mm shank padlock works well with the hasp, providing sufficient security without adding excessive weight. The builder may choose a weather‑resistant padlock to avoid rust in rainy climates. Once locked, the basket can be detached from the bike but will remain secured to the rider's bag or a stationary object.
Step 4: Mount the Brackets to the Bicycle Frame
Secure the mounting brackets to the bike's front fork using the integrated hooks on the Retrospec Apollo Basket. The SNAP ON & GO feature allows the basket to attach in seconds without tools, yet the brackets provide additional stability for lockable use. Align the brackets so that the basket sits level and does not obstruct the front wheel.
If additional reinforcement is desired, the builder can employ the Tfwadmx Folding Bike Front Basket as a supplementary support. This basket offers a heavy‑duty steel wire construction capable of bearing more than 80 lb, making it suitable for larger loads such as groceries or a small pet. Its foldable design allows it to be stored flat when not in use, which is advantageous for commuters who need to pack the bike in a car trunk.
Step 5: Attach Adjustable Straps for Extra Stability
Use the adjustable leather straps included with the ProSource Detachable Bike Front Basket to secure the basket firmly to the bike frame. The straps thread through the basket's rear loops and tighten around the fork, distributing weight evenly and reducing sway during rides over uneven pavement. Tighten each strap until the basket feels solid but does not deform the steel frame.
The ProSource basket is crafted from woven cane, providing a stylish alternative for riders who value aesthetics. While it is lighter than the steel options, its adjustable straps compensate for any potential movement, making it a practical choice for city commuters who prioritize visual appeal. The basket's 15 lb capacity is sufficient for a lunchbox, water bottle, and a few books.
Step 6: Test the Assembly and Make Adjustments
After installation, the builder should perform a test ride to evaluate balance, basket sway, and lock integrity. Begin with a short ride on smooth pavement, checking that the basket does not bounce excessively and that the lock remains engaged. If any wobble is detected, tighten the mounting brackets or adjust the strap tension accordingly.
For riders who require quick removal, the Schwinn Quick Release Bike Basket offers a built‑in quick‑release mechanism that can be added to the existing setup. Priced at $24.99 with a 4.4/5 rating, this basket includes a folding handle for hand‑carrying, which can be used as an auxiliary tote when the primary basket is locked on the bike. Incorporating the Schwinn quick‑release bracket enhances convenience without compromising security.
Tips & Pro Tips
- Apply a rust‑preventive spray to all steel components before assembly to extend the basket's lifespan.
- When using a padlock, select a model with a shrouded shank to deter bolt‑cutting attacks.
- For heavy grocery trips, distribute weight evenly by placing larger items at the bottom of the basket.
- Consider adding reflective tape to the basket edges for increased visibility during night rides.
- Store the detachable basket inside a lockable bike rack when leaving the bike unattended for extended periods.
Troubleshooting
Problem: Basket wobbles during rides.
Solution: Re‑tighten the mounting brackets and increase strap tension. If wobble persists, install a secondary bracket from the Tfwadmx Folding Bike Front Basket for added rigidity.
Problem: Padlock does not fit the hasp.
Solution: Verify that the hasp opening matches the padlock shank diameter. Replace the padlock with a 7 mm shank model if necessary.
Problem: Bracket interferes with brake cables.
Solution: Adjust the bracket position slightly higher on the fork or use a thin spacer to create clearance, ensuring that braking performance remains unaffected.
Conclusion
This guide has demonstrated how to build a lockable front bike basket that combines security, durability, and convenience for daily commuters. By selecting appropriate products such as the Retrospec Apollo Basket, Tfwadmx Folding Basket, Schwinn Quick Release Basket, and ProSource Detachable Basket, the builder can customize the solution to fit personal style and load requirements. The step‑by‑step process emphasizes safety, proper alignment, and effective locking techniques, resulting in a reliable storage accessory. Readers are encouraged to apply these methods, experiment with different configurations, and enjoy a theft‑resistant commuting experience.
Products Mentioned in This Guide
Frequently Asked Questions
What tools are needed to build a lockable front bike basket?
You’ll need a drill, screwdriver, wrenches, and optionally a strap tensioner for tightening the mounting straps.
Can any bike basket be converted into a lockable version?
The basket should have a sturdy steel frame and integrated hooks; the Retrospec Apollo Bike Basket is a recommended choice.
How is the locking mechanism attached to the basket?
Mount the hasp onto the basket’s side using the stainless‑steel brackets and secure it with a padlock through the hasp loop.
Is the finished lockable basket weather‑resistant?
Yes, the metal basket and stainless‑steel brackets resist rain, and a waterproof cover can provide extra protection.
Can the basket be removed quickly for storage or transport?
The adjustable straps and quick‑release brackets let you detach the basket in seconds without tools.