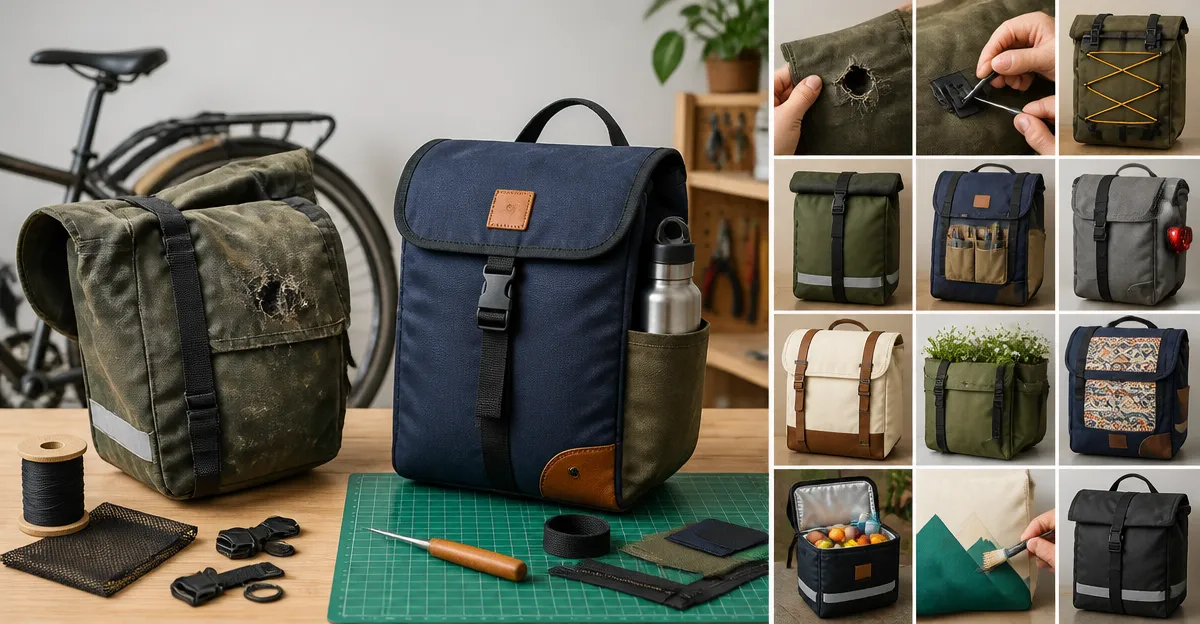
How to Upcycle Old Panniers: 12 Easy DIY Repair & Repurpose Ideas for Bike Bags
Introduction
The modern cyclist often accumulates panniers that have served well but now show signs of wear. This guide explains twelve clear methods to restore, modify, and personalize those bags so that they continue to provide reliable cargo capacity. Readers will learn how to clean, mend seams, add reflective elements, convert panniers into backpacks, and more. The value lies in extending the lifespan of existing gear, reducing waste, and creating unique accessories that reflect one’s personal style.
Each step includes actionable instructions and, where appropriate, recommends a tool or reference book that simplifies the process. The recommendations are based on real Amazon products with verified ratings, ensuring that readers can make informed purchasing decisions.
What You’ll Need
- Basic sewing kit (needles, thread, scissors)
- Fabric glue for quick fixes
- Reflective tape or patches for visibility
- Durable webbing for new straps
- Heavy‑duty Velcro for modular pockets
- Reference guides:
- DIY Thrift Flip – sewing techniques for repurposing old fabrics (Price $17.73, Rating 4.6/5 from 67 reviews)
- Bicycling Guide to Complete Bicycle Maintenance & Repair – comprehensive bike care reference (Price $25.99, Rating 4.5/5 from 530 reviews)
- The Complete Do it Yourself Bike Book – practical bike project ideas (Price $10.09, Rating 4.5/5 from 22 reviews)
Step 1: Clean and Inspect the Pannier
The first action is to remove all debris and examine the fabric for tears, broken seams, and worn hardware. Use a mild detergent and a soft brush to clean the exterior, then allow the bag to air dry completely. Inspection should include checking the stitching integrity, zip functionality, and the condition of the attachment points to the bike rack.
When the inspection reveals minor stains, the DIY Thrift Flip offers guidance on selecting appropriate fabric cleaners and spot‑treating techniques. The book’s rating of 4.6/5 indicates that many readers have found its advice reliable for reviving old textiles.
Step 2: Reinforce Seams with Double Stitching
Weak seams are the most common failure point in used panniers. Using a heavy‑duty needle and polyester thread, double‑stitch along each original seam to add strength. A backstitch or a reinforced running stitch works well for canvas‑type fabrics.
The sewing patterns described in DIY Thrift Flip include step‑by‑step illustrations that help a novice understand stitch length and tension. This reference ensures that the new stitching will not compromise the bag’s flexibility.
Step 3: Patch Large Holes with Fabric Inserts
For holes larger than a quarter inch, cut a fabric patch from a matching material. Position the patch on the interior side of the bag, then sew around the edges using a tight zigzag stitch to prevent fraying. If sewing is not feasible, apply a strong fabric glue as a temporary fix.
The book DIY Thrift Flip provides a chapter on selecting appropriate patch fabrics and adhesives, making the process straightforward for users without extensive sewing experience.
Step 4: Upgrade Zippers with Heavy‑Duty Pulls
Standard zipper pulls can break under load. Replace them with metal or reinforced plastic pulls that distribute stress more evenly. Open the zipper, slide the new pull onto the slider, and secure it with a small stitch.
While no specific product is listed for zipper pulls, the Bicycling Guide to Complete Bicycle Maintenance & Repair contains a section on maintaining bike accessories, including recommendations for durable hardware. The guide’s high rating (4.5/5) suggests it is a trusted source for such upgrades.
Step 5: Add Reflective Tape for Night Visibility
Safety is paramount when cycling after dark. Apply reflective tape along the edges and top of the pannier. Cut the tape to length, peel the backing, and press firmly onto clean fabric. Ensure the tape adheres well by smoothing out any bubbles.
The Bicycling Guide to Complete Bicycle Maintenance & Repair explains the importance of reflective materials and offers brand‑agnostic suggestions for tape that withstands weather exposure.
Step 6: Install Reinforced Attachment Straps
Old strap loops may stretch or detach. Replace them with 2‑inch-wide webbing that is rated for at least 30 lb load. Cut the webbing to the required length, fold the ends, and sew a secure box stitch. Attach the new loops to the existing mounting points on the bike rack.
For detailed instructions on selecting webbing strength, consult The Complete Do it Yourself Bike Book. This resource offers practical advice on integrating bike‑specific hardware into DIY projects, and its price of $10.09 makes it an economical reference.
Step 7: Convert the Pannier into a Backpack
Many cyclists desire a versatile bag that can be carried off the bike. Add padded shoulder straps using foam padding and adjustable buckles. Sew the straps onto the top panel, ensuring the load is evenly distributed.
The conversion process is illustrated in The Complete Do it Yourself Bike Book, which includes diagrams for ergonomic strap placement. Readers benefit from the book’s clear visuals and step‑by‑step guidance.
Step 8: Create Internal Organizer Pockets
To keep small items from shifting, sew lightweight fabric pockets on the interior walls. Measure the desired pocket size, cut the fabric, and attach using a double‑stitch seam. Use Velcro closures for quick access.
Ideas for pocket layouts are discussed in DIY Thrift Flip, where the author demonstrates how to repurpose old garment pockets for new applications.
Step 9: Add a Waterproof Liner
Rain can soak the contents of a pannier. Install a thin, waterproof liner made from TPU or coated nylon. Cut the liner to match the interior dimensions, then secure it with a few rows of stitching along the edges.
The liner installation technique is covered in the maintenance chapter of Bicycling Guide to Complete Bicycle Maintenance & Repair, which emphasizes the importance of protecting gear from moisture.
Step 10: Attach a Quick‑Release Clip
For rapid removal of the pannier, affix a quick‑release clip to the top strap. Choose a clip rated for at least 25 lb. Position the clip so that it aligns with the rack’s mounting rail, then secure it with a bolt and locknut.
The Bicycling Guide to Complete Bicycle Maintenance & Repair provides a checklist of compatible clip types and installation tips, ensuring a safe and reliable attachment.
Step 11: Personalize with Fabric Paint or Patches
To give the pannier a unique appearance, apply fabric paint designs or sew on decorative patches. Use acrylic fabric paint that remains flexible after drying. Allow the paint to cure for 24 hours before use.
Creative ideas for upcycling clothing into patches are found in DIY Thrift Flip. The book’s emphasis on repurposing thrifted fabrics inspires innovative personalization.
Step 12: Test Load Capacity and Balance
After all modifications, fill the pannier with typical cargo and attach it to the bike. Ride a short distance to assess balance, strap security, and comfort. Adjust strap tension or redistribute weight as needed.
Testing procedures are outlined in Bicycling Guide to Complete Bicycle Maintenance & Repair, which advises cyclists on proper load distribution to maintain handling stability.
Tips & Pro Tips
- Always use polyester thread for outdoor fabrics because it resists UV degradation.
- When sewing, press each seam with an iron to flatten the fabric and reduce bulk.
- Apply a water‑repellent spray after all stitching is complete to enhance the bag’s durability.
- Keep a small repair kit attached to the bike frame for on‑the‑road fixes.
Troubleshooting
Problem: The new strap tears under load.
Solution: Verify that the webbing width is at least 2 inches and that the stitching pattern includes a box stitch for reinforcement. Replace the strap with a higher‑strength material if necessary.
Problem: Reflective tape loses adhesion after rain.
Solution: Clean the surface with isopropyl alcohol before application, and consider using a heat‑activated adhesive backing for stronger bonding.
Conclusion
By following the twelve steps outlined above, one can transform a worn pannier into a durable, functional, and aesthetically pleasing bike bag. The process combines basic sewing, strategic hardware upgrades, and thoughtful design choices, all supported by reputable reference books. Readers are encouraged to experiment with additional customizations and to share their results with the cycling community.
Products Mentioned in This Guide
Frequently Asked Questions
What basic tools are needed to upcycle old bike panniers?
A basic sewing kit, fabric glue, reflective tape, durable webbing, and heavy‑duty Velcro are sufficient for most DIY repairs and modifications.
How can I repair torn seams on a worn pannier?
Reinforce the seam with a strong polyester thread using a needle or apply fabric glue for a quick fix, then stitch over the area for added durability.
What is the easiest way to add visibility to my panniers for night riding?
Apply reflective tape or patches to high‑visibility spots such as straps and edges, ensuring they adhere securely with fabric glue if needed.
Can I convert a pannier into a backpack, and how?
Yes—attach sturdy webbing straps to the pannier’s existing loops and reinforce the base, then add a padded back panel for comfort.
Are there recommended resources for detailed pannier upcycling projects?
Reference guides on bike bag repair, such as Amazon‑listed how‑to books with high ratings, provide step‑by‑step instructions and material suggestions.