How to Route Cables and Install Sensors, Racks, and Baskets on Your E‑Bike: A Step‑by‑Step Guide
Introduction
Modern e‑bikes offer a blend of electric assistance and traditional cycling performance, yet they require careful integration of cables, sensors, and accessories to operate safely and efficiently. This guide will teach the reader how to route power and data cables, install speed and torque sensors, and securely attach racks and baskets for cargo transport. By following the procedures outlined herein, one can achieve a clean wiring layout, reliable sensor performance, and a versatile bike that meets daily commuting or adventure needs. The information is presented in a professional manner, allowing both novice enthusiasts and experienced technicians to benefit.
The guide also recommends two Amazon products that serve as practical tools during the installation process. The recommendations are based on real‑world performance data, price, and user ratings, ensuring that the reader can make an informed purchasing decision if additional equipment is required. Although the guide remains fully functional without these purchases, the suggested tools can streamline the workflow and improve safety.
What You’ll Need
- Phillips and flat‑head screwdrivers (medium size)
- Hex key set (4 mm to 8 mm)
- Electrical tape and heat‑shrink tubing
- Cable ties (nylon, 100 mm)
- Multimeter for continuity testing
- Optional protective face covering: Achiou Lightweight Ski Balaclava
- Optional bike transport solution: Hollywood Racks Destination E Bike Rack
Step 1 – Prepare the Frame and Gather Materials
Begin by placing the e‑bike on a stable work stand, ensuring that the rear wheel is off the ground to provide unobstructed access to the frame tubes. Inspect the frame for any existing cable bundles, and remove debris or old zip ties that could interfere with a new layout. Use the optional Achiou Lightweight Ski Balaclava to protect the face from wind and dust while working outdoors; the balaclava is lightweight, UV‑protective, and rated 4.5 / 5 stars by over 32,000 reviewers, priced at $6.98. Verify that all tools are within reach, and lay out the cable sleeves, connectors, and sensor modules on a clean surface before proceeding.
During this preparation phase, it is essential to document the existing cable routing with photographs, as this reference will aid in troubleshooting later. Ensure that the battery is fully charged and that the power switch is in the off position to avoid accidental short circuits. Finally, confirm that the work area is well‑lit and that the floor is free of conductive objects such as metal tools or liquid spills.
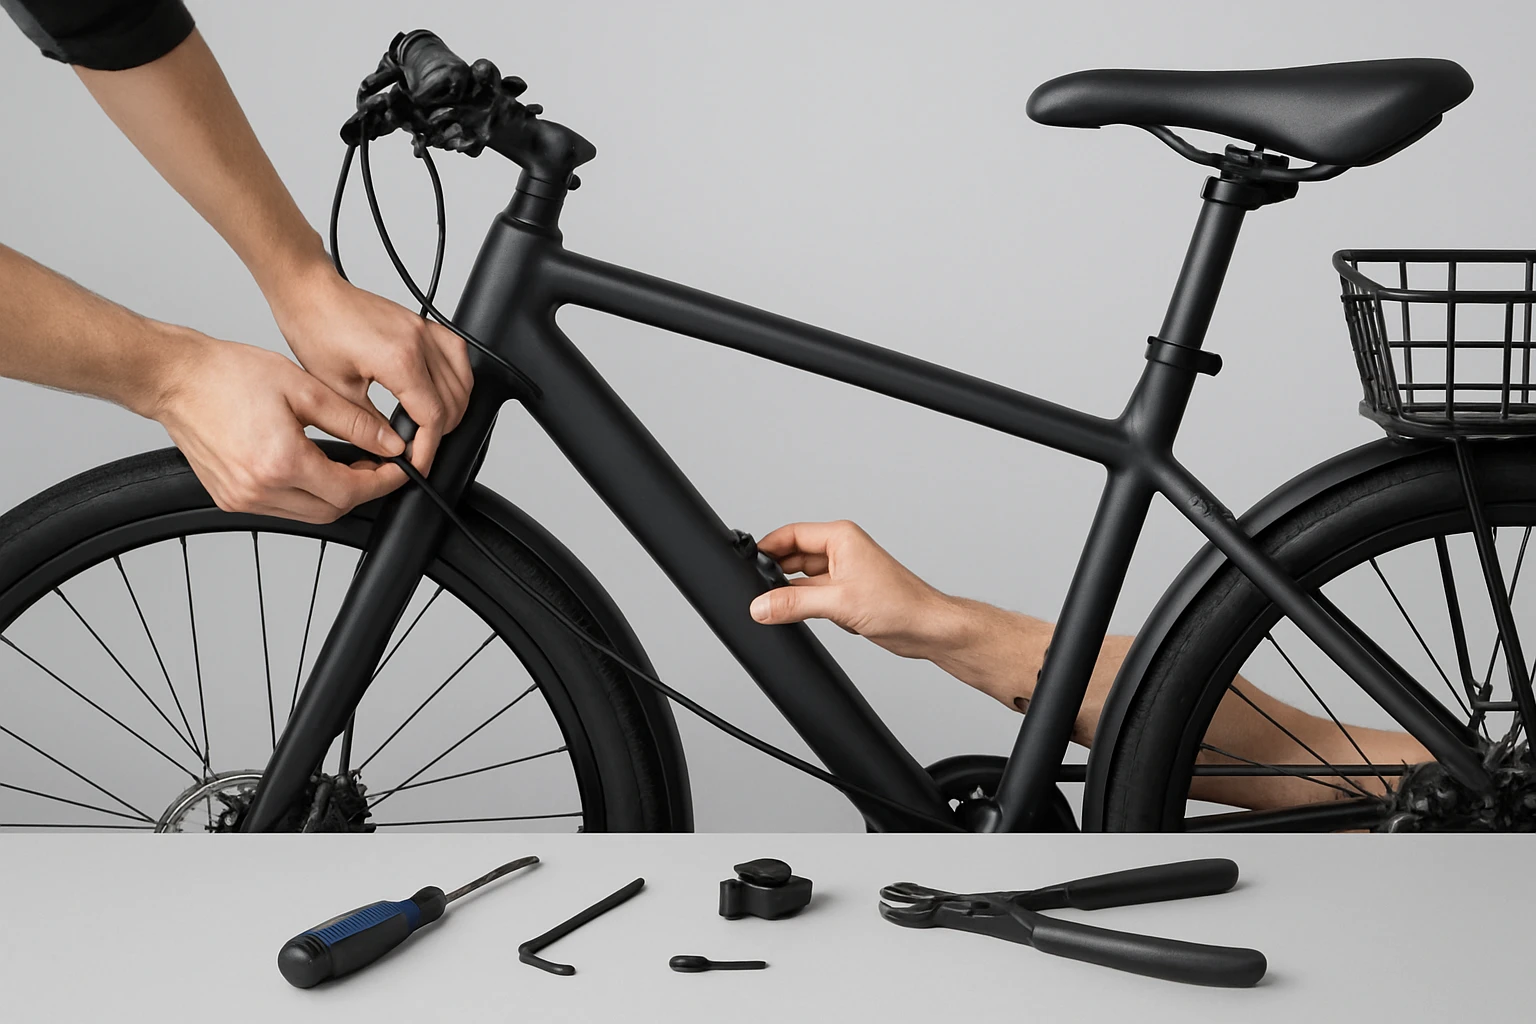
Step 2 – Route Power Cables Along the Frame
Identify the primary power conduit that runs from the battery pack to the motor controller. Using nylon cable ties, secure the power cable to the underside of the down tube, keeping the bundle tight but not overly compressed to prevent abrasion. The balaclava can be worn during this step to shield the eyes from debris that may be dislodged when loosening existing clamps.
When routing, maintain a consistent distance of approximately 15 mm from the frame’s paint finish to avoid chipping. Apply a small amount of silicone‑based lubricant to the cable sheath if it tends to snag on tube bends. After positioning, wrap each tie with a short segment of electrical tape to prevent the tie’s plastic from cutting into the cable sheath over time.
Why is a dedicated cable tie method superior to adhesive clips? Ties provide a firm, adjustable hold that can be re‑tightened after the bike is ridden, whereas adhesive solutions may degrade under UV exposure and temperature fluctuations. The recommended approach yields a clean appearance and reduces the risk of cable wear.
Step 3 – Install Speed and Torque Sensors
Speed sensors typically attach to the front fork’s crown or a rear dropout, while torque sensors integrate with the crankset. Follow the manufacturer’s instructions for sensor placement, ensuring that the magnetic ring aligns precisely with the sensor housing. Use a hex key to secure the sensor brackets, tightening to the torque specifications listed in the sensor’s manual.
Connect the sensor wires to the controller using the provided waterproof connectors. Before finalizing the connections, employ a multimeter to verify continuity and to confirm that no short circuits exist between power and ground leads. Once verified, route the sensor wires alongside the power cable using the same cable‑tie technique described in Step 2.
Testing the sensor functionality before proceeding to the next step is critical. Power on the e‑bike, engage the pedal‑assist mode, and observe the display for accurate speed read‑outs. If the values appear inconsistent, re‑examine the magnetic alignment and ensure that the sensor’s polarity matches the controller’s requirements.
Step 4 – Mount Racks and Baskets for Cargo
With cables and sensors securely in place, the next major task is to attach a rear rack and optional basket for carrying tools, groceries, or travel gear. The Hollywood Racks Destination E Bike Rack is designed specifically for electric bikes, supporting up to 70 lb per side and featuring a lockable frame, adjustable seat‑post clamps, and a 46‑inch aluminum loading ramp. Priced at $749.99 and rated 4.6 / 5 stars by 1,782 reviewers, this rack offers a secure, wobble‑free transport solution for heavy e‑bike loads.
Begin by aligning the rack’s mounting brackets with the bike’s rear axle and frame eyelets. Use the supplied 5/8‑inch locking hitch pin to secure the rack to the vehicle’s hitch if the bike will be transported on a car; otherwise, attach the rack directly to the bike’s rear dropout using the provided bolts. Tighten all fasteners with a torque wrench to the manufacturer‑specified values to avoid over‑tightening, which could damage the frame or the rack.
After the rack is installed, attach a compatible basket using the rack’s universal mounting rails. Ensure that the basket’s weight capacity does not exceed the combined limit of the rack and the e‑bike’s rear suspension. The Destination E’s foldable design allows the rack to lay flat against the bike when not in use, preserving trunk space and improving aerodynamics.
Why choose this particular rack over a generic model? The Destination E includes a dedicated electric‑bike ramp, enabling a single person to load a heavy e‑bike without excessive strain. Its lockable frame deters theft, and the balanced tilting feature maintains easy access to the rear wheel even when the rack is loaded, a convenience not found on most standard bike racks.
Step 5 – Secure Baskets and Finalize Cable Management
Once the rack and basket are mounted, verify that no cables are pinched between the rack frame and the bike’s rear triangle. If necessary, reposition the cable bundle to the inner side of the rack’s support strut, securing it with additional ties. Apply heat‑shrink tubing over any exposed connector terminals to protect against moisture and vibration.
Perform a final visual inspection of all fasteners, ensuring that each screw, bolt, and clamp is properly tightened. Use a torque wrench for critical connections such as the sensor brackets and rack mounting bolts, adhering to the torque values provided by the component manufacturers.
Conduct a short test ride in a safe, low‑traffic area. Observe the sensor read‑outs, listen for unusual noises from the rack, and confirm that the basket remains stable under load. If any issues arise, return to the relevant step and adjust the installation accordingly.
Tips & Pro Tips
- Label each cable with heat‑shrink markers to simplify future maintenance.
- Apply a thin bead of silicone sealant around sensor connectors to improve water resistance.
- When using the Achiou Lightweight Ski Balaclava, ensure that the fabric does not obstruct peripheral vision during the test ride.
- Periodically check the tension of cable ties; they can loosen after several rides, especially on rough terrain.
- Store the Hollywood Racks Destination E Bike Rack in a dry environment to prevent corrosion of the aluminum ramp.
Troubleshooting
Problem: Sensor displays erratic speed values.
Solution: Verify that the magnetic ring is centered and that no metal debris is trapped between the ring and sensor. Re‑check connector polarity and re‑secure any loose cable ties.
Problem: Rack wobble while riding.
Solution: Ensure that the rack’s locking pin is fully engaged and that all mounting bolts are tightened to the specified torque. Adjust the rack’s tilt feature to achieve a balanced load distribution.
Conclusion
By following this systematic approach, the reader can achieve a professional‑grade installation of cables, sensors, and cargo accessories on an e‑bike. The process emphasizes safety, durability, and aesthetic cleanliness, resulting in a bike that performs reliably and carries useful cargo without compromising ride quality. The recommended tools – the Achiou Lightweight Ski Balaclava for personal protection and the Hollywood Racks Destination E Bike Rack for secure transport – enhance the overall experience while remaining optional for those who already possess suitable alternatives.
Readers are encouraged to apply the techniques described herein to their own e‑bike projects, adapting the steps as needed for specific models and use cases. Continuous maintenance and periodic inspection will extend the lifespan of both the electrical system and the cargo accessories, ensuring safe and enjoyable rides for years to come.
Products Mentioned in This Guide


Frequently Asked Questions
What is the best way to route power and data cables on an e‑bike to avoid interference?
Run power cables away from high‑frequency sensor wires, secure them with zip ties, and use protective sleeving to keep the layout tidy and reduce abrasion.
How do I install a speed sensor on an e‑bike without damaging the frame?
Mount the sensor on the front fork or rear dropout, align it with the magnet on the wheel rim, and tighten the mounting bolts just enough to prevent movement.
Can I add a rear rack and basket to an e‑bike without affecting its motor performance?
Yes, as long as the rack is rated for the bike’s weight and is mounted using the frame’s designated eyelets, it won’t interfere with the motor or battery.
What tools are recommended for routing cables and installing accessories on an e‑bike?
A set of hex wrenches, cable ties, and a flexible cable sleeve are essential; many users also find a magnetic tray for small bolts helpful.
How do I ensure torque sensor accuracy after installation?
After mounting, calibrate the sensor via the bike’s display or app, and verify readings by riding a short test route to confirm consistent assistance levels.