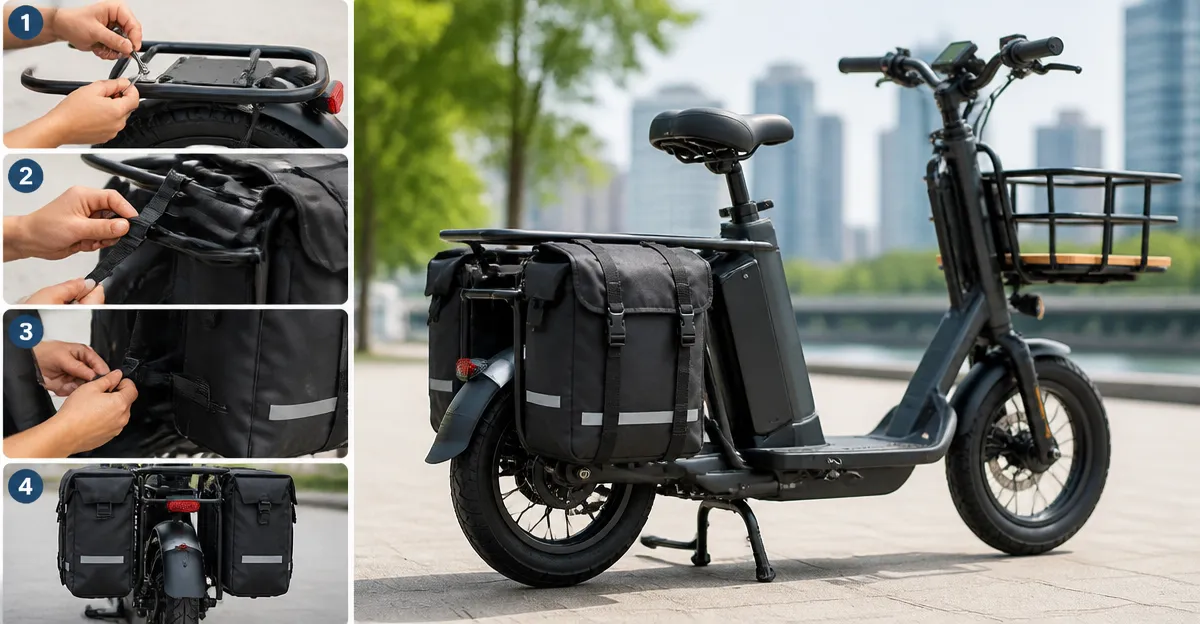
Introduction
Mounting pannier bags on an electric cargo scooter transforms a simple ride into a versatile transport solution. In this guide, readers will learn how to select the appropriate bag, attach it safely, and maintain balance for optimal performance. The instructions are designed for commuters, delivery riders, and outdoor enthusiasts who require hands‑free cargo capacity. By following the steps, one can avoid common pitfalls such as wobble, reduced range, or premature wear on the scooter frame.
What You’ll Need
- Compatible rear rack (factory‑installed or aftermarket)
- Adjustable mounting straps (usually included with the pannier)
- Reflective tape or accessories for night visibility
- Optional rain cover if riding in wet conditions
- Tools: hex key or screwdriver as required by the rack
For the pannier itself, two highly rated KEMIMOTO models are recommended. The first is the KEMIMOTO Rear Bike Rack Bag, an 8‑liter water‑resistant bag suitable for daily commuting. The second option is the KEMIMOTO Expandable Rear Rack Bag, offering 10‑20 L capacity and a removable rain cover for longer trips.
Step 1: Verify Rack Compatibility
The first task is to confirm that the scooter’s rear rack can accommodate a pannier. Measure the rack width and length; the KEMIMOTO Rear Bike Rack Bag fits racks up to 6.9 inches wide and 11‑14 inches long, while the Expandable Rear Rack Bag supports widths from 5.5 to 7.5 inches. Ensure the rack is securely bolted to the scooter frame using the supplied hardware. If the rack is missing, install a compatible aftermarket rack that meets the manufacturer’s load specifications.
Step 2: Choose the Appropriate Pannier
For short urban trips with a few items, the 8 L KEMIMOTO Rear Bike Rack Bag provides sufficient space and a lightweight profile. Its PVC‑oxford fabric is water‑resistant, and the soft‑shell construction keeps the overall weight low, preserving scooter range. For longer journeys or when carrying groceries, tools, and a water bottle, the KEMIMOTO Expandable Rear Rack Bag offers up to 20 L of storage, a built‑in hard panel for shape retention, and a removable rain cover.
Key specifications:
- KEMIMOTO Rear Bike Rack Bag: 8 L, $29.99, 4.6/5 rating (1,324 reviews)
- KEMIMOTO Expandable Rear Rack Bag: 10‑20 L, $32.99, 4.5/5 rating (589 reviews)
Step 3: Attach the Mounting Straps
Both KEMIMOTO bags include three strong sticker straps that adhere to the rear rack. Clean the rack surface with alcohol to remove dust and oils, then press the straps firmly for at least 30 seconds. The straps prevent the bag from sliding during acceleration or braking. For the Expandable model, four robust straps and two hooks provide additional stability, especially when the bag is fully loaded.
Why these straps matter: they distribute the load evenly across the rack, reducing stress on the scooter’s frame and preserving handling characteristics. Alternative solutions such as generic bungee cords may slip under vibration, leading to unsafe conditions.
Step 4: Secure the Bag and Adjust Load Distribution
Place the heaviest items—such as a laptop, groceries, or tools—near the bottom of the main compartment. Use the adjustable elastic rope at the top of the 8 L bag, or the internal divider of the Expandable bag, to keep items from shifting. Balance the load left‑to‑right by centering the bag on the rack; an uneven distribution can cause the scooter to pull to one side.
Both bags feature side pockets and mesh top pockets for quick access to smaller items, reducing the need to open the main compartment while riding. The reflective PVC strips on the rear and sides of the 8 L bag, and the reflective strip on the water‑bottle pocket of the Expandable bag, enhance visibility during night rides.
Step 5: Install Optional Night‑Riding Accessories
Attach a rear taillight to the strap provided on the 8 L bag, or use the dedicated strap on the Expandable bag’s water‑bottle pocket. Position the light so that it is visible from behind without obstructing the reflective strips. A bright LED taillight improves safety and complies with many local traffic regulations.
These accessories are optional but highly recommended for commuters who ride after dark. Using a dedicated strap ensures the light remains fixed, unlike a makeshift clip that could detach on uneven terrain.
Step 6: Test Stability Before Riding
With the bag fully attached, give the scooter a gentle push forward and backward to feel for any wobble. If the bag shifts, re‑tighten the mounting straps and verify that the rack bolts are secure. Check the scooter’s handling by performing a short test ride in a safe area, paying attention to steering response and braking performance.
Make any necessary adjustments before embarking on a longer journey. A well‑balanced setup will not only feel smoother but also conserve battery life by reducing aerodynamic drag.
Tips & Pro Tips
- Do not overload the pannier beyond its rated capacity; excess weight can strain the scooter’s motor and brakes.
- When riding in rain, consider the removable rain cover that comes with the Expandable bag to keep contents dry.
- Periodically inspect the sticker straps for adhesive degradation, especially after exposure to heat or sunlight.
- Use the soft‑shell design of the 8 L bag for quick errands; its lightweight nature minimizes impact on range.
- For maximum visibility, combine the bag’s reflective strips with a bright front headlight and reflective clothing.
Troubleshooting
Problem: Bag slides sideways during acceleration.
Solution: Re‑apply the mounting straps, ensuring the rack surface is clean. If the adhesive has lost strength, replace the straps with new ones from a hardware store.
Problem: Water leaks into the main compartment.
Solution: The PVC fabric is water‑resistant but seams are not sealed. Use the removable rain cover (included with the Expandable bag) or place a waterproof liner inside the bag.
Problem: Reduced scooter range after adding a pannier.
Solution: Distribute weight low and central, and consider removing non‑essential items. Aerodynamic drag can be minimized by keeping the bag’s profile streamlined.
Conclusion
Mounting pannier bags on an electric cargo scooter enhances utility without compromising safety when performed correctly. By selecting a compatible KEMIMOTO bag, securing it with the provided straps, balancing the load, and testing stability, one can enjoy hands‑free transport for groceries, work equipment, or outdoor gear. The guide equips riders with practical knowledge to maintain performance, extend battery life, and ride confidently in any weather.
Products Mentioned in This Guide
Frequently Asked Questions
Can I use any rear rack to mount pannier bags on an electric cargo scooter?
The rack must be compatible with your scooter's frame and able to support the pannier's weight; factory‑installed or aftermarket racks designed for cargo scooters work best.
How do I secure the pannier to prevent wobble while riding?
Use the adjustable mounting straps, tighten them according to the bag’s instructions, and double‑check that the bag sits flush against the rack without gaps.
Will adding panniers affect the scooter's range?
Carrying extra weight can slightly reduce range, but using a lightweight, water‑resistant bag and distributing load evenly minimizes the impact.
What tools are required for installing a pannier on an electric cargo scooter?
Typically a hex key or screwdriver that matches the rack’s mounting bolts; no specialized tools are needed.
How can I improve visibility when riding with panniers at night?
Attach reflective tape to the bag and consider adding LED accessories or a reflective rain cover for enhanced night‑time safety.