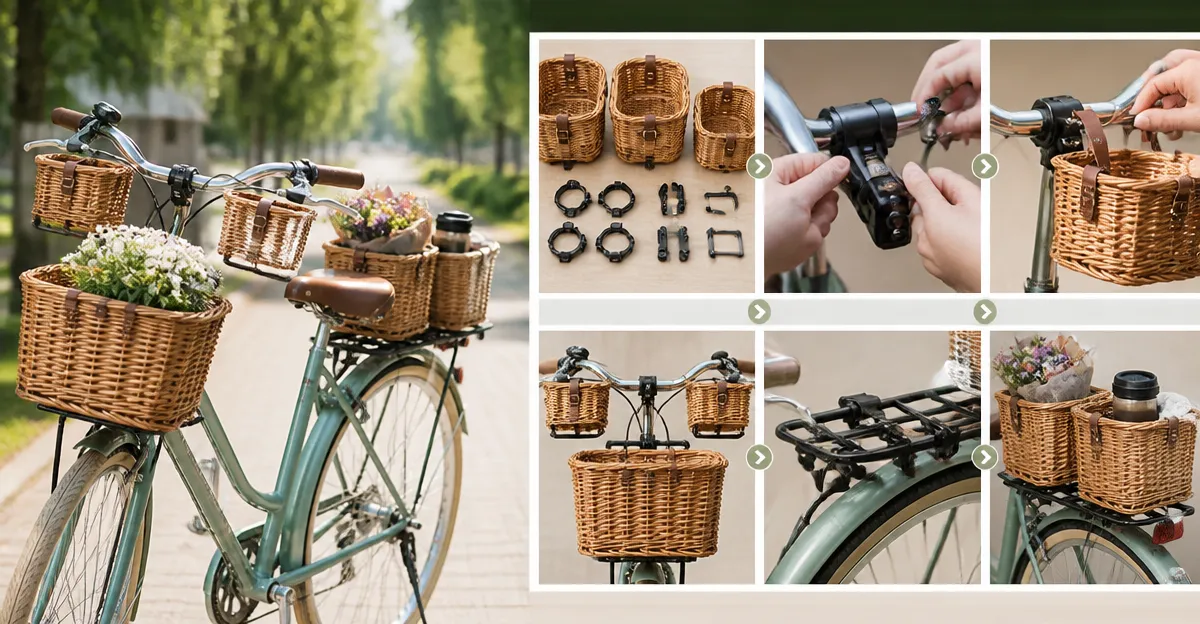
How to Mount Multiple Small Baskets on a Bike: Step-by-Step Guide for Secure, Balanced Storage
This guide will teach the reader how to attach several small baskets to a bicycle, achieve a stable weight distribution, and maintain safe handling while riding. The information is valuable because improper mounting can cause wobble, reduced control, and premature wear on the frame. By following the instructions, one can transform a standard bike into a versatile carrier for groceries, work supplies, or recreational gear. The guide also suggests reliable products that simplify each stage of the process.
What You Will Need
- Adjustable mounting straps or zip ties (preferably stainless steel)
- Measuring tape and a marker
- Allen key set for quick‑release brackets
- Soft cloth for protecting finish during installation
- One or more small bike baskets suited to the intended mounting location
The following products have been selected from reputable manufacturers and are available on Amazon. Each product fulfills a specific need within the installation workflow.
Step 1: Assess Frame Geometry and Load Distribution
Begin by examining the bicycle frame to identify suitable mounting points on both the front fork and the rear rack area. Measure the distance between the intended basket positions and mark the spots with a removable marker. Ensure that the combined weight of the baskets will not exceed the manufacturer’s recommended load capacity, typically fifteen pounds for front accessories. This assessment prevents over‑loading, which can impair steering or stress the rear axle.
Step 2: Gather and Prepare the Mounting Hardware
Secure the adjustable straps that accompany the GRANNY SAYS Front Bike Basket. The basket includes built‑in straps designed for a tool‑free installation, but additional stainless‑steel zip ties can provide extra reinforcement for larger loads. Lay the hardware on a clean surface and inspect each component for damage before proceeding. Tighten any loose connections on the bike’s existing rack to create a stable base for the new baskets.
Step 3: Install the Front Basket
Attach the GRANNY SAYS Front Bike Basket to the front fork using the included straps. Position the basket so that the cup holder faces upward, allowing easy access to beverages while riding. The waterproof natural rattan construction resists rain and adds a vintage aesthetic that complements many bicycle styles. Adjust the straps until the basket sits level with the handlebars; a level basket reduces torque on the steering column.
Key product details:
- Waterproof natural rattan material, eco‑friendly and weather‑resistant
- Built‑in cup holder and stabilizing baseboards
- Tool‑free installation with adjustable straps
- Rating 4.5/5 from 113 reviews
Step 4: Install a Secondary Front Basket (Optional)
If additional storage is required, a second small basket can be mounted on the opposite side of the fork using the same strap system. Ensure that the two baskets are symmetrically placed to maintain balance. The Schwinn Quick Release Wire Basket is an excellent complementary option because its quick‑release bracket allows rapid removal when the extra capacity is not needed.
Key product details:
- Quick‑release mounting bracket for fast attachment and removal
- Folding handle converts the basket into a hand‑carried tote
- Weather‑resistant coating protects the wire from rust
- Price $24.99, rating 4.4/5 from 4,093 reviews
Step 5: Install the Rear Basket
Secure the Ytonet Large Rear Bike Basket onto the rear rack using the supplied mounting hardware. Align the basket’s reinforced frame with the rack’s crossbars, then tighten the bolts with an Allen key. The insulated inner layer keeps perishable items cool, while the waterproof cover shields contents from rain during commutes. Position the basket so that the bulk of the load sits low and centered, which improves stability and handling.
Key product details:
- Large capacity (17.5" × 12.5" × 6.5") for groceries and tools
- Thick padded lining and reinforced body for impact protection
- Insulated compartment and removable rain cover
- Price $43.99, rating 4.6/5 from 15 reviews
Step 6: Fine‑Tune Balance and Secure All Straps
After all baskets are mounted, load a typical set of items and observe the bike’s balance. Adjust the strap tension on each basket until the weight is evenly distributed between the front and rear axles. Verify that no strap is twisted or rubbing against the frame, as this could cause wear over time. Perform a short test ride in a safe area, checking for wobble or steering drift; make any final adjustments before using the bike in traffic.
Tips & Pro Tips
- Use a soft cloth between the strap and the frame to prevent scratches.
- When transporting liquids, place the cup holder basket on the side opposite the dominant hand to reduce spillage.
- For long rides, consider a lightweight lock to secure the baskets against theft.
- Periodically inspect the mounting hardware for looseness, especially after riding over rough terrain.
Troubleshooting
| Problem | Possible Cause | Solution |
|---|---|---|
| Basket tilts forward | Straps not tightened evenly | Re‑adjust strap tension on each side until the basket sits level. |
| Rattling noise while riding | Loose mounting bolts | Use an Allen key to tighten all bolts; add a rubber washer if vibration persists. |
| Water leaks into insulated bag | Rain cover not fully sealed | Ensure the waterproof cover is fully zipped and positioned over the bag’s opening. |
Conclusion
The reader now possesses a systematic method for mounting multiple small baskets on a bicycle while preserving safe handling and aesthetic appeal. By assessing frame geometry, selecting appropriate mounting hardware, and using the recommended products, one can achieve a balanced load that enhances the utility of any bike. The guide encourages experimentation with different basket configurations to suit personal needs, and reminds the reader to perform regular maintenance checks.
Products Mentioned in This Guide
Frequently Asked Questions
Can I mount multiple small baskets on any type of bike frame?
Yes, as long as the frame has suitable mounting points and can support the combined weight without compromising balance.
What is the best way to ensure balanced weight distribution when using several baskets?
Place the heaviest items low and centered, and distribute the baskets evenly on both sides of the bike.
Do I need special tools to attach the baskets, or are basic tools enough?
Basic tools like an Allen key, measuring tape, and zip ties or straps are sufficient for most installations.
How can I prevent wobble or frame damage while riding with multiple baskets?
Secure each basket tightly with adjustable straps, use soft cloths to protect the finish, and regularly check for looseness.
Are there recommended products for mounting small baskets securely?
Stainless‑steel adjustable mounting straps, quick‑release brackets, and zip ties from reputable brands are ideal for a sturdy, removable setup.