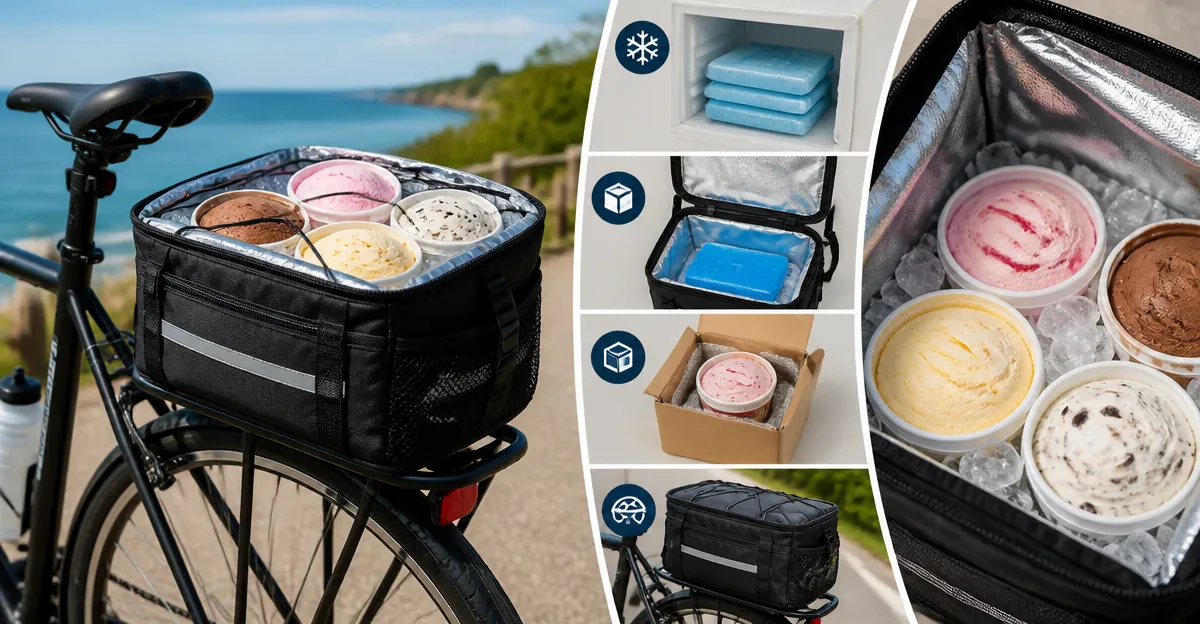
How to Keep Ice Cream Frozen on a Bike: Meltdown-Free Rides
Introduction
Riding a bike while transporting ice cream can feel like a high‑stakes experiment. The combination of sunshine, wind, and movement creates a perfect storm for melted desserts. This guide explains how to maintain a frozen state for ice cream during a bike ride, allowing cyclists to deliver treats, enjoy picnics, or simply satisfy a craving without a sticky mess. Readers will learn essential preparation steps, recommended gear, and troubleshooting techniques that transform a potential disaster into a reliable, enjoyable experience.
By the end of the article, one will possess a clear plan, a list of proven products, and practical habits that keep ice cream at the ideal temperature for up to twelve hours. The information is valuable for food‑truck cyclists, event volunteers, and anyone who wishes to combine exercise with a sweet reward.
What You'll Need
- A high‑efficiency insulated cooler bag (see product recommendations below).
- Reusable ice packs or dry ice, depending on ride length.
- Bike rack or pannier system capable of securely holding the cooler.
- Water‑resistant straps or bungee cords for added stability.
- Thermal reflective liner (optional) for extreme heat.
Step 1: Choose the Right Insulated Cooler
The foundation of any successful ice‑cream‑on‑a‑bike operation is an insulated container that can retain cold temperatures despite external heat and motion. Two products stand out for their balance of capacity, weight, and leak‑proof construction.
The first option is the TOURIT 48-Can Insulated Cooler Bag. This soft‑sided cooler offers a 32 L interior capable of holding up to 48 cans, which translates to roughly 10–12 standard ice‑cream tubs. Its high‑efficiency thermal layer promises up to 12 hours of chill, and the 100 % leak‑proof PEVA liner prevents any drips from contaminating bike components. Weighing only 0.6 kg, it adds minimal load, while the padded shoulder strap and multiple handles facilitate easy loading and unloading.
The second alternative is the Hydro Flask 12L Insulated Cooler Bag. Although smaller, this bag excels in ultra‑light performance and can keep contents cold for up to 24 hours when paired with ice packs. Its recycled polyester fabric is water‑resistant, and the compression‑molded lid provides a stable base that resists tipping on uneven terrain. With a rating of 4.7/5 from over a thousand reviewers, it is praised for durability and ease of cleaning.
Select the cooler that matches the volume of ice cream you intend to transport. For a family picnic, the larger TOURIT model is appropriate; for solo rides or short‑duration deliveries, the Hydro Flask bag offers a compact, lightweight solution.
Step 2: Prepare Ice Packs and Position Them Correctly
Ice packs should be frozen at least 24 hours before the ride to ensure they start at the lowest possible temperature. Place the packs at the bottom of the cooler, as cold air sinks and will create a chilled floor for the ice cream containers. Then, arrange the ice‑cream tubs upright against the sides of the bag, leaving a thin layer of air between each container and the cooler walls. This arrangement maximizes surface contact with the cold air while preventing the tubs from moving during transit.
If the ride exceeds eight hours or temperatures exceed 30 °C, consider adding a small quantity of dry ice. Handle dry ice with gloves, and ensure the cooler is well‑ventilated; the gas released (carbon dioxide) can build pressure if sealed tightly.
Both recommended coolers have interior pockets that can hold additional small packs without compromising the main compartment’s insulation. The TOURIT bag’s front zippered pockets are ideal for storing a spare pack or a thermally reflective liner.
Step 3: Secure the Cooler to Your Bike
Once the cooler is packed, attach it to a sturdy rear rack or front pannier system. Use the adjustable padded shoulder strap of the TOURIT bag to loop around the rack’s crossbar, then tighten with a bungee cord to prevent shifting. For the Hydro Flask bag, employ its removable cross‑body strap to create a loop around the rack, and secure the handles with Velcro straps.
It is crucial to balance the load evenly on both sides of the bike. An unbalanced cooler can affect steering and increase the risk of a tip‑over. If the cooler is heavy, consider adding a second small bag on the opposite side to distribute weight.
Check that the cooler does not interfere with the wheel’s rotation or brake cables. A quick spin of the wheels while the cooler is attached will reveal any rubbing points that need adjustment.
Step 4: Optimize Ride Conditions
Plan the route to avoid prolonged exposure to direct sunlight. Shade‑rich streets, tree‑lined paths, or early‑morning rides reduce heat gain. If the journey is longer than two hours, pause in a shaded area to allow the cooler to reset its temperature gradient.
Maintain a moderate riding speed. High speeds generate wind that can strip away the thin layer of cold air surrounding the cooler, accelerating melt. A steady pace of 12–15 km/h provides enough airflow for comfort without compromising the cooler’s internal temperature.
Carry a small handheld fan or a portable misting bottle to create a micro‑climate around the cooler during brief stops. This technique is especially useful on hot summer days when ambient temperatures approach 35 °C.
Step 5: Unpack and Serve
Upon reaching the destination, open the cooler gently to preserve the cold air inside for any remaining servings. Use the cushioned top grab handle of the TOURIT bag to lift the cooler without spilling any residual melt. The Hydro Flask’s wide top opening allows quick access, making it ideal for serving multiple people quickly.
If any ice cream has softened but not fully melted, place the tubs back into the cooler for a few minutes to re‑solidify before serving. This final step ensures a pleasant texture and prevents drips on clothing or bike components.
Tips & Pro Tips
- Pre‑chill the cooler: Store the empty cooler in the freezer for 30 minutes before loading ice packs. A pre‑chilled container extends overall cooling time.
- Use reflective covers: A lightweight, reflective emergency blanket wrapped around the cooler reflects solar radiation, reducing heat absorption.
- Layer ice packs: Alternate frozen packs with a layer of crumpled newspaper. The paper acts as an additional insulator and absorbs any condensation.
- Monitor temperature: Small, reusable temperature strips placed on the interior wall give a quick visual cue of internal temperature.
- Emergency melt‑stop: If a sudden heat spike occurs, briefly place the cooler in a shaded, breezy spot and add a fresh ice pack to reset the temperature.
Troubleshooting
Problem: Ice cream begins to melt within 2 hours.
Solution: Verify that the ice packs were fully frozen and that the cooler was sealed properly. Add an extra pack, and check that the cooler’s zipper is fully closed to prevent warm air infiltration.
Problem: Cooler shifts during riding, causing instability.
Solution: Re‑tighten all straps, and consider using a second strap across the rear rack to lock the cooler in place. Ensure the load is balanced left‑to‑right.
Problem: Condensation drips onto bike components.
Solution: Place a waterproof liner (such as a zip‑lock bag) inside the cooler beneath the ice packs. The liner captures excess moisture, keeping the bike clean.
Conclusion
Keeping ice cream frozen on a bike is entirely achievable with proper preparation, the right insulated cooler, and mindful riding practices. By selecting a high‑performance cooler like the TOURIT 48‑Can Insulated Cooler Bag or the Hydro Flask 12L Insulated Cooler Bag, arranging ice packs strategically, and securing the bag correctly, one can enjoy melt‑free desserts on any ride. Implement the tips and troubleshooting steps provided, and every cyclist will be equipped to deliver frozen treats confidently.
Now, equipped with knowledge and tools, one can embark on any journey—whether a weekend market run or a charity ride—knowing that the ice cream will arrive as perfectly frozen as when it left the freezer.
Products Mentioned in This Guide
Frequently Asked Questions
How can I keep ice cream frozen on a bike for long rides?
Use a high‑efficiency insulated cooler bag with ice packs or dry ice and secure it on a bike rack or pannier.
What type of cooler bag works best for bike transport?
Choose a lightweight, insulated cooler bag with thick walls and a tight‑seal zipper to maintain low temperatures.
Should I use reusable ice packs or dry ice for a bike trip?
Reusable ice packs are ideal for short rides, while dry ice extends cooling up to 12 hours for longer trips.
How should I secure the cooler on my bike?
Mount the cooler in a sturdy pannier or on a bike rack, using straps or bungee cords to prevent shifting.
What are quick troubleshooting tips if ice cream starts to melt?
Add extra ice packs, shade the cooler, and minimize exposure to direct sunlight and wind until you can re‑freeze.