Introduction
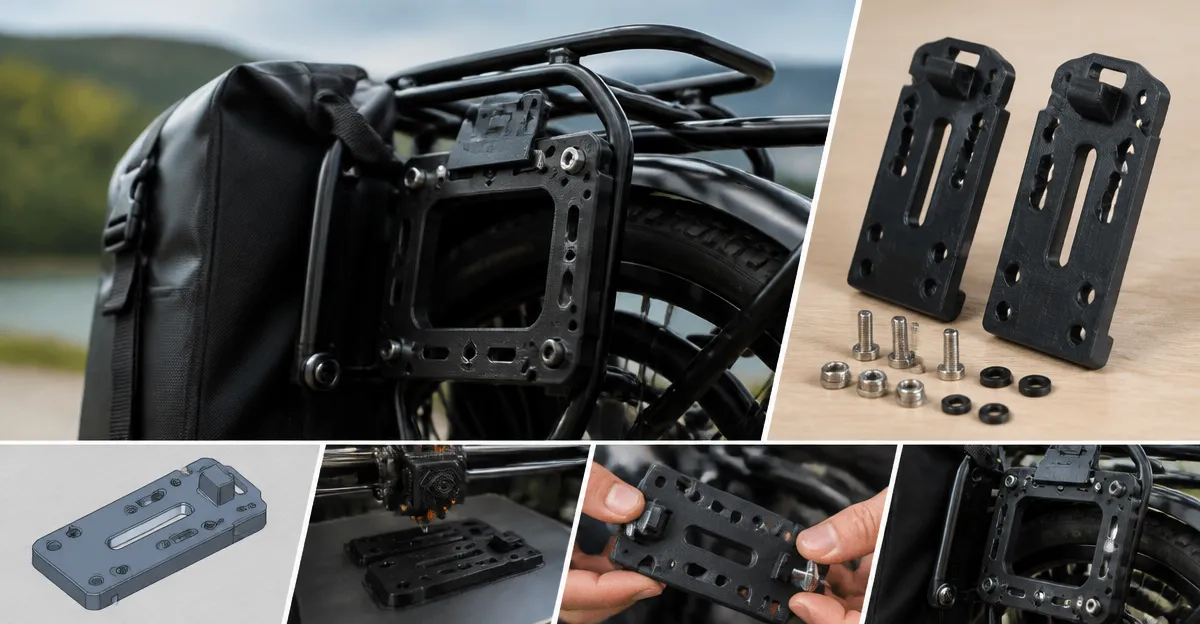
In recent years, cyclists have increasingly turned to additive manufacturing to solve niche mounting challenges. This guide explains how to design, print, and install a custom 3D‑printed pannier adapter that fits any bicycle rack perfectly. Readers will learn the essential background, step‑by‑step procedures, product recommendations, and best practices to achieve a reliable and durable solution. By the end of the article, one will be equipped to create a tailor‑made adapter without compromising safety or functionality.
Background and Context
Traditional pannier systems rely on standardized hardware that may not align with every frame geometry or cargo requirement. When a rider wishes to attach a basket, a non‑standard bag, or a lightweight cargo carrier, mismatched dimensions often result in instability. 3D printing offers the flexibility to fabricate adapters that bridge these gaps, allowing cyclists to customize mounting points precisely.
Understanding the mechanical interface between a rack and a pannier is crucial. Most racks use a 28 mm diameter tube, though some older models employ 22 mm or 30 mm profiles. The adapter must distribute load evenly, resist shear forces, and avoid damaging the rack’s finish. Selecting appropriate filament, layer height, and infill density directly influences strength and weight.
In addition to printed components, off‑the‑shelf hardware can simplify installation and improve durability. The following sections integrate three highly rated Amazon products that complement a DIY adapter workflow.
Designing a Custom Adapter
The first step is to create a digital model that matches the rack’s dimensions and the intended pannier’s mounting points. One should begin by measuring the rack’s outer diameter, the spacing between mounting holes, and the clearance required for the bag or basket.
Computer‑Aided Design (CAD) software such as Fusion 360 or FreeCAD provides precise control over dimensions. A typical adapter consists of a cylindrical sleeve that slides over the rack tube and a flanged plate that bolts to the pannier or basket. Incorporating slots for bolts allows the use of standard M5 or M6 screws.
For cyclists who prefer a ready‑made mounting bracket, the YehVeh Rear Bike Basket Mounting Kit offers a convenient pre‑fabricated solution. The kit includes two metal bars, each 14.5 cm long, and all necessary screws and nuts. When combined with a printed sleeve, the metal bars provide additional reinforcement at high‑stress locations.
Design guidelines include:
- Maintain a minimum wall thickness of 3 mm for PETG or ABS prints.
- Use a fillet radius of at least 2 mm on all internal corners to reduce stress concentration.
- Include clearance holes of 0.2 mm larger than the bolt diameter to accommodate tolerances.
- Design the outer profile to match the rack’s curvature, typically a 28 mm diameter for modern bikes.
Choosing Materials and Print Settings
Material selection balances strength, weather resistance, and ease of printing. PETG is widely favored for outdoor accessories because it offers good impact resistance and UV stability while remaining flexible enough to absorb vibrations.
When printing with PETG, set the nozzle temperature between 230 °C and 250 °C and the bed temperature around 70 °C. A layer height of 0.2 mm provides a smooth surface without excessively long print times. Infill density should be set to at least 50 % for structural components, using a grid or gyroid pattern to maximize shear strength.
For riders who anticipate heavy loads or rough terrain, ABS may be preferable due to its higher tensile strength. However, ABS requires a heated enclosure to prevent warping, which may not be available in all home‑based setups.
Regardless of filament, post‑processing steps such as sanding, acetone vapor smoothing (for ABS), or applying a UV‑resistant clear coat can extend the adapter’s lifespan.
Integrating Off‑the‑Shelf Hardware
While a printed sleeve provides the primary interface, adding metal reinforcement can prevent deformation under load. The YehVeh Rear Bike Basket Mounting Kit includes two sturdy iron brackets that can be bolted to the printed flange, creating a hybrid solution that leverages the strengths of both materials.
For cyclists who wish to convert an existing backpack or tote into a pannier, the Vincita Pannier Attachment Kit supplies adjustable hooks, rails, and all necessary hardware. The kit’s universal hook fits rack diameters up to 28 mm, making it compatible with most modern frames. By threading the printed adapter through the kit’s hooks, one can secure a custom bag without purchasing a dedicated pannier.
When using the Vincita system, drill the recommended holes in the bag’s rigid panel, then slide the rails through the printed sleeve. The set screws on the hooks allow fine‑tuning of the bag’s position, ensuring adequate heel clearance and preventing interference with the pedal stroke.
For riders who prefer a fully waterproof solution, the Burley 22L Roll‑Top Waterproof Panniers provide a ready‑made bag that can be attached to the printed adapter using the Vincita hooks. These panniers feature heat‑sealed seams, reflective patches, and a roll‑top closure that keeps gear dry in inclement weather.
Comparison and Selection Guide
Choosing the right combination of printed and commercial components depends on the rider’s priorities. The table below summarizes the key attributes of each featured product.
| Product | Primary Use | Price | Rating | Key Advantages |
|---|---|---|---|---|
| YehVeh Rear Bike Basket Mounting Kit | Metal brackets for basket attachment | $7.97 | 4.3/5 (11 reviews) | Includes screws and nuts; easy installation; compatible with most baskets |
| Vincita Pannier Attachment Kit | Convert bags into panniers | Not listed | 4.4/5 (414 reviews) | Adjustable hooks; complete hardware set; fits 28 mm racks |
| Burley 22L Roll‑Top Waterproof Panniers | Waterproof cargo storage | $119.95 | 4.6/5 (29 reviews) | Roll‑top design; reflective patches; durable tarpaulin fabric |
For a budget‑conscious build, pairing a printed adapter with the YehVeh brackets provides sufficient strength at minimal cost. Riders seeking versatility should consider the Vincita kit, as it allows any bag to become a pannier. When weather protection is paramount, the Burley panniers combined with a printed adapter deliver a premium, all‑weather solution.
Best Practices and Tips
- Verify rack diameter before printing; measure with a caliper for accuracy.
- Print a small test piece to confirm dimensional tolerance and filament adhesion.
- Use thread‑locking compound on bolts to prevent loosening during rides.
- Apply a thin layer of silicone grease to the printed sleeve’s interior to facilitate smooth sliding over the rack.
- Periodically inspect the adapter for cracks, especially after long rides or exposure to extreme temperatures.
- When attaching a waterproof pannier, ensure the roll‑top seal remains unobstructed by the adapter’s hardware.
- Document the CAD model version and print settings for future replication or sharing with the cycling community.
Frequently Asked Questions
1. Can I use PLA filament for a pannier adapter?
PLA is easy to print but lacks the heat resistance and impact strength required for outdoor cycling. It may deform in hot climates or under heavy loads, so PETG or ABS are recommended alternatives.
2. How do I determine the correct bolt size for my adapter?
Measure the existing rack’s mounting holes; most modern racks use M5 or M6 bolts. Design the adapter’s bolt holes to match these dimensions, adding a 0.2 mm clearance for tolerances.
3. Is the Vincita kit compatible with frames that have a 30 mm rack tube?
The hooks are engineered for a maximum diameter of 28 mm. For larger tubes, one would need to use a spacer or select a different hardware set.
4. Do the Burley panniers require a specific rack width?
They are compatible with rack bars ranging from 8 mm to 15 mm, making them suitable for most standard rear racks.
5. How often should I tighten the adapter bolts?
It is advisable to check bolt tension after the first 10 kilometers and then at regular intervals of 100 kilometers, or after any significant impact.
6. Can I paint a PETG adapter without affecting its strength?
Yes, a light coat of acrylic paint applied after sanding will not compromise structural integrity, provided the paint does not fill the layer lines excessively.
7. What is the best way to store printed adapters when not in use?
Store them in a dry, temperature‑controlled environment away from direct sunlight. Placing them in a protective bag prevents dust accumulation and surface scratches.
Conclusion
This guide has presented a systematic approach to designing, printing, and installing a custom 3D‑printed pannier adapter. By understanding rack geometry, selecting appropriate filament, and integrating reliable off‑the‑shelf hardware, cyclists can achieve a secure and personalized cargo solution. The recommended products—YehVeh brackets, Vincita attachment kit, and Burley waterproof panniers—enhance the DIY process while catering to diverse needs and budgets. With careful implementation of the best practices outlined, one can enjoy reliable cargo transport on any adventure.
Products Featured in This Guide
YehVeh Rear Bike Basket Mounting Kit
Price: $7.97
Rating: 4.3/5 (11 reviews)
Featured because it provides sturdy metal brackets and all necessary fasteners, allowing the printed adapter to handle heavier baskets with confidence.
Vincita Pannier Attachment Kit
Rating: 4.4/5 (414 reviews)
Featured because it enables cyclists to convert existing bags into panniers, offering adjustable hooks that complement the custom‑printed adapter for versatile cargo solutions.
Burley 22L Roll-Top Waterproof Panniers
Price: $119.95
Rating: 4.6/5 (29 reviews)
Featured because they provide a high‑capacity, weather‑proof storage option that pairs seamlessly with the printed adapter and Vincita hardware for premium touring setups.